


ENG-11ENG-10
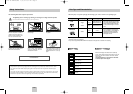
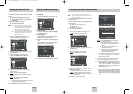
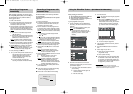
Plug & Auto Set up
Tuning Your Television for the
DVD-VCR
Your DVD-VCR will automatically set itself up when it
is plugged into the mains for the first time. TV stations
will be stored in memory. The process takes a few
minutes. Your DVD-VCR will then be ready for use.
1 Connect the coaxial cable as indicated on page 8.
(Connecting Your DVD-VCR to the TV Using the
Coaxial Cable)
2 Plug the DVD-VCR into the mains.
3 Start the auto scanning.
◆
The number of stations automatically stored by
the DVD-VCR depends on the number of
stations that it has found.
4 The current time and date are displayed
automatically.
Check the date and time.
if it is :
◆
Incorrect, see page 12.
◆
Correct, Press RETURN button twice to exit the
menu.
It is only necessary to tune your DVD-VCR if you are
not using a SCART.
➢
To view pictures from your DVD-VCR when a
Scart cable is used, the television must be set to
the audio/video mode (AV).
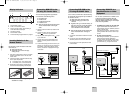
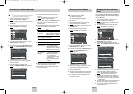
1 Switch on the television.
2 Switch on the DVD-VCR by pressing STANDBY/ON
on the front of the DVD-VCR or STANDBY/ON on
the remote control.
3 Select a programme position on the television to be
reserved for use with your DVD-VCR.
4 Insert the video cassette in the DVD-VCR. Check
that the DVD-VCR starts reading the cassette;
if not, press
❿
II
button.
5 Start a scan on your television or set the television
to UHF channel 60.
6 Fine tune the television until the pictures and sound
are obtained clearly.
7 If you cannot find the pictures and sound, or there
is interference from nearby channels, it may be
necessary to change the setting of the DVD-VCR
output channel (see Setting the DVD-VCR Output
Channel on page 16 and Problems and Solutions
on page 45).
8 When the picture and sound are perfectly clear,
store this channel at the desired programme
position on the television.
Result: That programme is now reserved for use
with your DVD-VCR.
➢
Now, you only have to switch the DVD-VCR on
and it is ready for use.
☛
Function for “Plug & Auto Set Up” is fixed already.
So if you want to change this fixed one, you can
change it by Presetting the Stations Automatically
in OSD “ Auto Setup” menu. (see page 13)
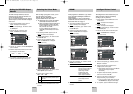
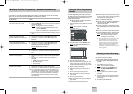
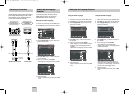
TV
Connecting the Audio Output
Cable
Connecting DVD-VCR to a
Satellite Receiver or Other
Equipment
You can connect your DVD-VCR to a Hi-Fi system.
Example
: You wish to take advantage of the quality of
your Hi-Fi stereo system when watching a
programme or recording via your DVD-VCR.
☛
◆
Regardless of the type of connection
chosen, you must always connect the
coaxial cable supplied. Otherwise, no
picture will be visible on the screen when
the DVD-VCR is switched off.
◆
Make sure that both the television and the
DVD-VCR are switched off before
connecting the cables.
1 Connect the coaxial cable or SCART as indicated
on page 8.
2 Plug the audio output cable into the audio
connectors on the rear of your DVD-VCR.
3 Plug the other end of the audio cable into the
appropriate input connectors on your Hi-Fi stereo
system.
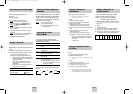
1 AV2 IN: By means of 21-pin Scart Cable
Plug the SCART Cable with satellite receiver or
other equipment into the AV2 (DEC./EXT.) socket
on the rear of the DVD-VCR.
After making this connection, select the source by
pressing the INPUT SEL. button for the AV2 input
sources.
2 By means of RF Coaxial Cable
After making this connection, you must preset the
station received through the satellite tuner.
RF output channel of the satellite receiver should
be adjusted away from channel 60, which is used
by the DVD-VCR, e.g. re-adjust to channel 65.
SCART Cable
RF coaxial cable
Aerial
1
2
Satellite Receiver or other Equipment
Aerial Connector
TV
AUDIO
LINE OUT
COAXIAL
DIGITAL
AUDIO OUT
OPTICAL
S-VIDEO OUT
1
2
2
00374C SV-DVD440/XEU 1/30/04 5:07 PM Page 10