


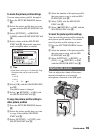

34
To save the adjusted white balance
value in memory A or B
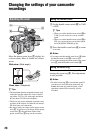
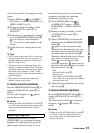
1 Set the white balance memory switch to
A (
A) or B ( B) in step 3 of
“Adjusting to natural color (White
balance).”
2 Capture a white subject, such as white
paper, full-screen in the same lighting
condition as the one in which the subject
is.
3 Press (one push) button C.
A or B starts flashing rapidly. It
will stay on when the white balance
adjustment is completed and the
adjusted value is stored in
A or
B.
To adjust the white balance
automatically
Press the WHT BAL button A or set the
AUTO/MANUAL switch D to AUTO.
b Notes
• When you set the AUTO/MANUAL switch D
to AUTO, other manual adjustments (iris, gain,
shutter speed) also become automatic.
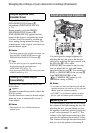
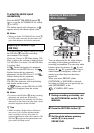
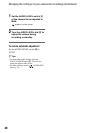
You can customize the picture quality by
adjusting picture profile items such as
[COLOR LEVEL] and [SHARPNESS].
Connect your camcorder to a TV or
monitor, and adjust the picture quality
while observing the picture on the TV or
monitor screen.
Picture quality settings for different
recording conditions are stored in [PP1]
through [PP6] as default settings.
b Notes
• When you set [x.v.Color] of the
(CAMERA SET) menu to [ON], the
picture profile will be disabled.
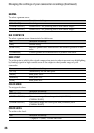
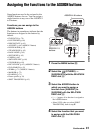
Indicator Shooting conditions
A
(Memory A)
B
(Memory B)
• White balance values
adjusted for light
sources can be stored
in memory A and
memory B. Follow the
steps in “
To save the
adjusted white balance
value in memory A or
B” (p. 34).
Outdoor
([OUTDOOR])
• Recording neon signs
or fireworks
• Recording sunset/
sunrise, just after
sunset or just before
sunrise
• Under daylight color
fluorescent lamps
n
Indoor
([INDOOR])
• Under the lighting
conditions that change
in many ways, such as
a party hall
• Under strong light
such as in a
photography studio
• Under sodium lamps
or mercury lamps
Customizing the picture quality
(Picture profile)
Changing the settings of your camcorder recordings (Continued)