


89
Audio dubbing
Editing
Audio dubbing
This feature lets you record over the normal
audio track. The monaural sound previously
recorded is replaced while the original hi-fi
sound remains unchanged. Use this feature
to add commentary to a tape that you have
recorded with a camcorder.
Before you start...
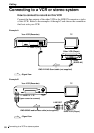
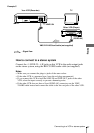
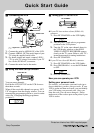
• Open the t LINE-2 L o R jacks cover on the front panel and connect a playback source.
• Turn on the TV and set it to the video channel.
To stop editing
Press x (stop) on this VCR and the stereo system (or other VCR).
To listen to both the hi-fi and normal audio
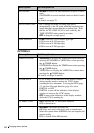
Set AUDIO MIX to ON in the OPTIONS-1 menu (see page 83). Use this
feature to listen to dubbed audio over the original hi-fi audio. When AUDIO
MIX is set to ON, the AUDIO MONITOR button does not function.
Remember to reset AUDIO MIX to OFF after playing the tape.
Note
• If you eject the tape or turn the VCR off, AUDIO MIX is automatically set to OFF.
1
Insert a source tape into your stereo system (or the playback VCR).
Search for the point to start playback and set it to playback pause.
2
Insert a prerecorded tape with its safety tab in place into this (recording)
VCR. Search for the start of the section to be replaced and press
X (pause).
The VCR enters pause mode.
3
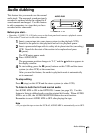
Press AUDIO DUB.
The programme position changes to “L2,” and the indicator appears in
the display window.
4
To start editing, press the X (pause) buttons on this VCR and the stereo
system (or other VCR) at the same time.
After you use this feature, the audio in playback mode is automatically
set to monaural.
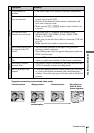
t LINE-2 L o R
AUDIO DUB
X