


Sony Corporation
Printed on chlorine-free 100% recycled paper.
Quick Start Guide
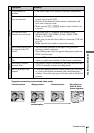
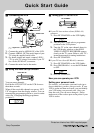
1 Connecting the VCR
1
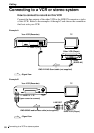
...Connect the aerial to AERIAL IN of the VCR.
2...Connect AERIAL OUT the aerial input of your
TV using the supplied aerial cable.
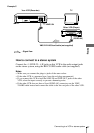
3...For better picture and sound, connect LINE-1
(TV) to your TV using a Scart cable if your TV
has a Scart (EURO-AV) connector.
4...Connect the mains lead to the mains.
2 Using the Auto Set Up function
You can preset channels.
Hold down AUTO SET UP on the VCR for more
than three seconds.
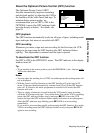
When all the receivable channels are preset, “SET
UP” disappears from the display window. You can
rearrange the programme position to your favourite
order (see “Changing/disabling programme
positions”).
3 Tuning your TV to the VCR
A If your TV does not have a Scart (EURO-AV)
connector
1 ...Press RF CHANNEL on the VCR lightly.
2 ...Turn on your TV and select a programme
position for the VCR picture.
3 ...Tune the TV to the same channel shown in
the VCR display window so that SONY
VIDEO CASSETTE RECORDER appears
clearly on the TV screen. Refer to your TV’s
instruction manual for tuning instructions.
4 ...Press RF CHANNEL.
B If your TV has a Scart (EURO-AV) connector
1 ...Press RF CHANNEL on the VCR lightly.
2 ...Press PROGRAM +/– to set the RF channel
to OFF.
3 ...Press RF CHANNEL.
Now you can operate your VCR.
Setting your personal code
For security, you can enter a personal code (up to
eleven characters), such as your post code. If your
VCR is stolen and then recovered, you can identify
your VCR using your personal code. Once you
enter the code, you can never change it. Please
make a note of the code to quote to the police if your
VCR is stolen.
1
2
3
4
AERIAL OUT
AERIAL IN
: Signal flow
yLINE-1 (TV)
AUTO SET UP
RF CHANNEL
PROGRAM +/–