


14
Installing and Connecting the TV
VHF/UHF R-AUDIO-L VIDEO S VIDEO R-AUDIO-L
VIDEO 2 INVIDEO 1 IN AUDIO OUT
RL
DC IN 16.5V
YP
B
P
R
VMC-810S/820S
(not supplied)
VCR
S VIDEO
Rear of TV
Satellite receiver
75-ohm
coaxial
cable
(supplied)
Cable
YC-15V/30V
(not supplied)
VMC-
810S/820S
(not supplied)
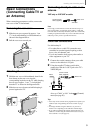
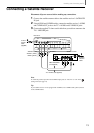
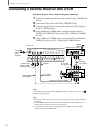
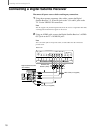
Connecting a Satellite Receiver with a VCR
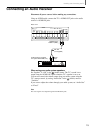
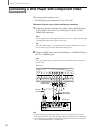
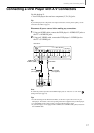
Disconnect all power sources before making any connections.
1 Connect the satellite antenna cable to the satellite receiver’s SATELLITE
IN jack.
2 Connect the CATV cable to the VCR’s VHF/UHF IN jack.
3 Using the supplied 75-ohm coaxial cable, connect the VCR’s OUT jack
to the TV’s VHF/UHF jack.
4 Using AUDIO and S VIDEO cables, connect the satellite receiver’s
AUDIO and S VIDEO OUT jacks to the VCR’s AUDIO and S VIDEO
IN jacks.
5 Using AUDIO and S VIDEO cables, connect the VCR’s AUDIO and S
VIDEO OUT jacks to the TV’s AUDIO and S VIDEO IN jacks.
Note
To watch the pictures input from the S VIDEO input jack, set “Auto YC” to “On” in the
(Setup) menu (See page 12).
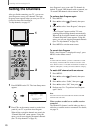
Tips
• Be sure your VCR’s video input is set correctly. Consult your VCR’s operating manual for
instructions.
• Use TV/VIDEO on the remote control to select VIDEO 1 IN to watch satellite TV or to
watch a tape on the VCR (your VCR must be turned on).
• If your VCR or satellite receiver is not equipped with S VIDEO, use a VIDEO cable
(yellow) instead of the S VIDEO cable.
75-ohm coaxial cable (supplied)
YC-15V/30V
(not supplied)
Satellite
antenna
cable
AUDIO-R (red)
AUDIO-L (white)
VIDEO (yellow)