


CV0204DVR
47
SVAT ELECTRONICS
Now
You
Can
See
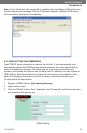
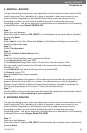
Step 2:
Enter the user name and password as shown below (admin by default) and press the
OK button.
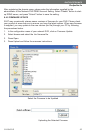
Step 3:
Select the Applications and Gaming tab.
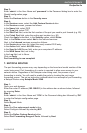
Step 4:
Select the Port Range Forwarding tab.
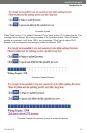
In the Application column enter a description of your DVR.
In the Start entry field enter the first number of the port you need to port forward (e.g. 80)
In the End entry field enter the last number of the port you need to port forward (e.g. 80)
In the Protocol field, select Both.
In the IP address field, enter the computer network IP address you recorded previously
during the Quick Set Up Guide process.
Enable the system by checking the enabled box.
Select the Save settings button located at the bottom of the page to save your changes.
Port forwarding is now complete!
4. LINKSYS WIRED ROUTER
4. LINKSYS WIRED ROUTER
The port forwarding process is dependant on the brand and model number of the router
being used. Port forwarding of a router is required with your system to allow user access
to your network device. Regardless of the Linksys Wired Router being used, the process
of port forwarding is similar. You will need to enable the ports by locating the port range
forwarding screen. With some Linksys routers the port forwarding screen is located
within the Applications and Games or Filters tab; in others it is located in the advance
tools tab. The set up instruction outlined below is an example of port forwarding using
Linksys Model BEFSR41.
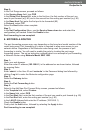
Step 1:
Open your web browser. Enter the router IP address in the address bar as shown below
(192.168.1.1), followed by pressing Enter.
Step 2:
Enter the user name and password as shown below (admin by default) and press the OK button.
Step 3:
Select the Applications and Gaming tab.
Step 4:
Select the Port Range Forwarding tab.
In the Application column enter a description of your network device (e.g. monitor)
In the Start entry field enter the first number of the port you need to port forward (e.g. 80)
In the End entry field enter the last number of the port you need to port forward (e.g. 80)
In the Protocol field, select Both.
In the IP address field, enter the computer network IP address you recorded previously
during the Quick Set Up Guide process.
Enable the system by checking the enabled box.
Select the Save settings button located at the bottom of the page to save your changes.
Port forwarding is now complete!