TASCAM DR-05
11
TASCAM DR-05
11
Manually adjusting the input level
1.
Press the RECORD [0] button to enter recording
standby.
2.
Use the . and / buttons to adjust the input level.
Meters that show the input level settings appear at the
bottom of the display.
If the input is too high, the PEAK indicator on the upper left
above the display lights just before recorded sound would
distort.
A b mark is provided at -12dB on the level meters. Set the
recording level so that level changes occur near this mark
without causing the PEAK indicator to light red.
Using the Level Control Function
You can set the level control function for recording through a
microphone.
1.
Press the RECORD [0] button to begin recording
standby.
2.
Press the QUICK button to open the quick menu.
3.
Select (highlight)
LEVEL CTRL
and press the 7 button
to open the settings screen.
4.
Use the + and − buttons to select (highlight) the desired
function, and press the 7 button to enable it and return
to the recording screen.
8
PEAK REDUCTION
The input volume is reduced automatically to an appropriate
level when excessively large signals come in. The recording
level can be raised manually when desired. This function is
suitable for recording music with volume changes that affect
the sound negatively. After making the setting, the set level is
retained even if it is turned off.
8
AUTO LEVEL
Using this function, the recording level is automatically
increased when the input sound is too quiet or decreased
when it is too loud. This function is useful for recording
meetings, for example. In this mode, the recording level cannot
be changed manually.
8
LIMITER
This function prevents distortion when signals that are too
loud are input suddenly. This is useful when you do not want
to change the recording level.
In this mode, the recording level can be changed manually
even when recording.
Recording
1.
Press the RECORD [0] button to enter recording
standby.
2.
Press the RECORD [0] button again to start recording.
3.
Press the (HOME)[8] button to finish recording.
When recording starts, the REC indicator lights continuously,
and the display shows the elapsed recording time and the
remaining recording time.
8
Pausing recording
You can pause recording and then continue recording in the
same file.
1.
When recording, press the RECORD [0] button again.
2.
Press the RECORD [0] button again to resume recording.
Using the low-cut filter
Use the low-cut filter if you want to cut noise and other sounds
at low frequencies. This function can be used to reduce air-con-
ditioning noise and unpleasant wind noise, for example.
1.
Select MENU w REC SETTING and press the 7 button.
2.
Set the
LOW CUT
item on the
REC SETTING
screen.
Options: 40Hz, 80Hz, 120Hz, OFF
The higher the number (frequency) is, the wider the band of
low frequencies that will be cut.
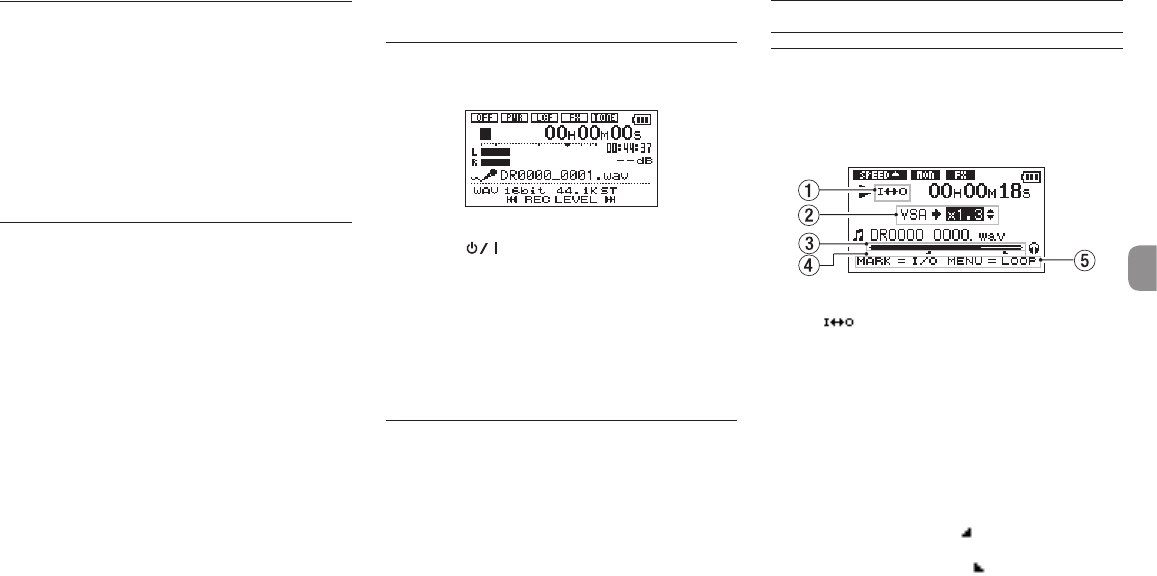
Playback
Playback Control screen
During playback or when stopped, press the PB CONT button
to open the Playback Control screen.
Recording is not possible when this screen is open. Use the
. and / buttons to skip to IN/OUT points and the file
beginning/end. You cannot skip to the previous or next file.
1 Loop playback status
The icon appears when loop playback is enabled.
2 Playback speed
This shows the playback speed as a multiple of the normal
speed. VSA appears on the left when variable speed
audition, which allows tempo to be changed without
changing pitch, is enabled.
3 Playback position display
The current playback position is shown by a bar.
4 Loop playback IN (starting) and OUT (ending) points
The set IN (starting) and OUT (ending) points of the loop
are shown.
When the IN point is set, the icon appears at the corre-
sponding position.
When the OUT point is set, the icon appears at the
corresponding position.
5 Usable buttons
The shown buttons are available when the Playback
Control screen is open.
MARK: Create or delete an IN or OUT point.
MENU: Turn loop playback ON or OFF.


