


GB
GB
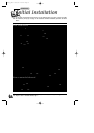
Installation
5
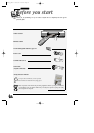
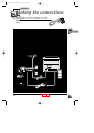
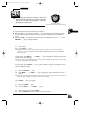
Did you insert the batteries in the remote control ?
For detail instructions, see inside the cover.
-
+
SIZE AA 1,5 V 0%MERCURY
GREENELL
EXTRA HEAVY DUTY
-
+
SIZE AA 1,5 V 0%MERCURY
GREENELL
EXTRA HEAVY DUTY
☺
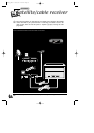
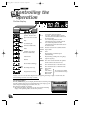
5 Press ▼ (11) to select Reception then choose Aerial (for channels received via roof
aerial) or Cable (for cable channels) with C (12) or B (10).
6 Press ▼ (11) to select the Autosearch line, then press C (12) or B (10) several times
to search for the programme channel, or you may also directly enter a number with keys
0 to 9 (19).
" When a channel is found, the pictures come up on the screen.
7 When the picture is poor, select the Fine tuning line, then press C (12) or B (10) to
adjust the picture.
8 When the channel name is incorrect, select the Name line and with C (12) or B (10)
keys, select a name, or you may also enter a name by choosing the characters with the
keys 1 and 2 and press B (10) to move on to the next character.
9 If the channel is encoded, press ▼ (11) key, to select Decoder and check the box with
OK (13) key.
10 Position the cursor on Store on Pr and assign a channel number with C (12) or B (10)
keys, or you may also enter the number with keys 0 to 9 and press on OK (13).
11 If you wish to continue with TV channels installation, repeat steps 5 to 10. Otherwise,
press EXIT (14).
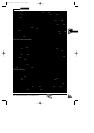
Sorting the channels
☺
The automatic channel installation assigns numbers to the channels in a pre-defined order.
These numbers may therefore not match the actual channel numbers. Should this be the case,
change these numbers by carrying out the instructions below. For easy channel identification, we
suggest that you have a TV magazine at hand.
1 With the MENU (15) key call up the SUMMARY menu.
2 With ▼ (11) key, select the Installation line, then validate with OK (13).
3 Select the Organizer line from the I
NSTALLATION menu and validate with OK (13).
4 Select the Select Pr line, and choose a channel by entering its number or by scrolling
with
CC
(12) or
BB
(10) keys.
5 If you wish to change the name of the channel, call up the Name line and with
CC
(12)
or
BB
(10) keys, scroll the names available, or you may enter the name with keys 1 and
2 and press B (10) to pass on to the next character.
6 Call up the Swap with Pr line to exchange two channels and enter the channel number
you wish to exchange with the channel which presently appears on the Select Pr line.
Validate with OK (13).
7 To delete the currently selected channel, call up the Delete Pr line and validate with OK
(13), reconfirm with OK (13).
Clock setting
☺
Your video recorder is fitted with an automatic clock setting feature that detects the clock setting
signals sent by some channels. If your video recorder clock is not right, you can set it right by
carrying out the steps below.
1 With MENU (15) key call up the SUMMARY menu.
2 With ▼ (11) key, select the Installation line, then validate with OK (13).
3 With ▼ (11) key, select the Clock set line and confirm with OK (13).
" The C
LOCK SET menu comes up.
4 If the displayed time is incorrect, select Auto clock line, then validate with OK (13).
5 If the displayed time is still incorrect, change clock in the following order: day, month,
time or year by means of ▲ (9) and ▼ (11) keys , and press
CC
(12) or
BB
(10) keys to
change them.
6 Validate with OK (13), then press EXIT (14) to leave clock setting.
r93s_GB01 9/06/00 11:28 Page 5