


74
MX196 (E/F) Web 213:276
Chapter 7: Using the THINC
™
home network feature
Description of fields in the “E-mail
Scheduling Setup” window
For instructions on entering data in these fields, see step 5
under “Setting up e-mail scheduling” (- page 70).
“E-mail Scheduling” field
You can select On or Off for the E-mail Scheduling field.
– When this field is set to On, it will be possible for the TV
to receive e-mails from any PC to remotely schedule and
modify recordings and reminders.
– When this field is set to Off, it will not be possible for the
TV to receive any e-mail, the other fields in this window will
be disabled (“grayed out”), and it will not be possible to
remotely schedule recordings or reminders via e-mail.
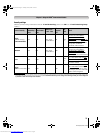
Also see the “Security settings” table on the next page.
“ID Required” field
You can select On or Off for the ID Required field.
– When this field is set to On (recommended), the ID you
entered in the “ID” field must be included in all e-mails you
send to the TV. This is a security feature to protect your TV
from unauthorized e-mail access.
– When this field is set to Off, you do not need to include the
ID in e-mails you send to the TV.
Also see the “Security settings” table on the next page.
“ID” field
Use the on-screen keyboard to enter six to 16 numbers and/or
letters to create your ID (spaces and punctuation are
not
allowed).
Also see the “Security settings” table on the next page.
Note:
• To help protect your privacy, you may want to choose an ID
that is different from any of your usual passwords or security
PINs (e.g., different from your personal e-mail password,
banking login code, social security number, etc.).
• The ID is case sensitive.
“E-mail Address” field
Use the on-screen keyboard to enter the TV’s dedicated e-mail
address (different from your personal e-mail address). You
will send e-mails to this address to add, modify, or delete
schedules and reminders.
“Account” field
Use the on-screen keyboard to enter the TV’s e-mail account
login. Depending on your ISP, this may be the entire e-mail
address or just the characters in the e-mail address before the
“@” sign.
“Password” field
Use the on-screen keyboard to enter the password for the TV’s
e-mail account.
Note: To help protect your other personal Internet or e-mail
accounts, create a password that is significantly different from
any of your usual passwords and security PINs (e.g., different
from your e-mail password, banking log-ons, social security
code, etc.).
“Incoming Mail Server” field
Use the on-screen keyboard to enter the incoming (POP3) mail
server that hosts the TV’s e-mail account.
Note: The TV does not support encrypted e-mail.
“Outgoing Mail Server” field
Use the on-screen keyboard to enter the outgoing (SMTP) mail
server associated with the TV’s e-mail account. (The TV will
use this server for sending reply e-mails to your personal
e-mail account.)
“E-mail Authorization” field
You can select On or Off for the “E-mail Authorization”
field.
– When this field is set to On (recommended), the TV will
only accept e-mails from the e-mail address you specify in
the “Authorized E-mail” field (e.g., your personal e-mail
address). The TV will delete any e-mails not sent from this
authorized e-mail address.
This is a security feature to protect the TV from
unauthorized e-mail access and from replying to
unwanted e-mail, such as spam.
– When this field is set to Off, it will be possible for the TV
to accept e-mails from any e-mail address (depending on the
other settings in the “E-mail Scheduling Setup”
window).
Also see the “Security settings” table on the next page.
“Authorized E-mail” field
Enter the single e-mail address that is authorized to send
e-mails to the TV (e.g., your personal e-mail address).
– To enable this field, you must set the “E-mail
Authorization” field to On.
– This field can be left blank if you have the “E-mail
Authorization” field set to Off.
Also see the “Security settings” table on the next page.
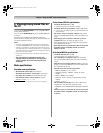
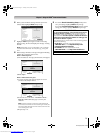
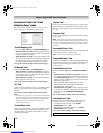
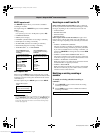
E-mail Scheduling Setup
E-mail Scheduling
Please enter your E-mail Setup Information.
On
ID Required
Advanced Test Cancel Done
Account
Password
Incoming Mail Server
Outgoing Mail Server
ID
E-mail Address
E-mail Authorization
Authorized E-mail
On
On
Enter YOUR E-mail here
XXXXXXXXXXXXXXXX
For home network troubleshooting tips, see Chapter 8.
MX196_EN.book Page 74 Tuesday, June 27, 2006 1:43 PM
Downloaded from www.Manualslib.com manuals search engine