89
7.9 Single Clip Backup
Refer to chapter 5.8.3, Clip Backup
7.10 Backing up to a CD-RW Drive or Hard Drive
To Backup video files to a CD-RW drive, or to a Hard Drive, follow these steps:
Backing up to a CD-RW Drive or Hard Drive
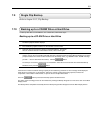
1. From the Main Display Screen select the BACKUP button.
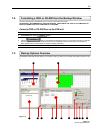
The Backup Options window displays.
2. From the Backup Options window, use the calendar to select a date.
3. Select the time(s) to backup by clicking on the desired blocks. The blocks
will turn red when selected. To deselect the blocks, click on them again.
4. To backup to CD media, insert a blank CD and follow the instructions for formatting a blank disk outlined in this
chapter. Click on the corresponding CD-R/W drive that is displayed inside the Select Backup Media box and when
prompted indicate the number of CDs needed to store the backup video (e.g. 980MB of video / 600MB of storage
per disk = 1.63 so 2 disks would be needed) . Click the
button.
To backup to a hard drive, check the box for Fixed HDD. Select the correct hard drive from the Select Backup
Media box, then press the
button.
If the amount of video exceeds the storage capacity of the media being used then an error message will be displayed
inside the error message box. If this happens, reduce the amount of video that is being exported, increase the
compression, select another media device, or span the file over multiple disks/drives.
Once the
button is pressed, the Backup Options window will close.
The status of the recording process can be monitored by viewing the Backup Progress bar. This can be seen on the Main
Display screen.
The Backup will be completed successfully when the Backup Progress Bar disappears from the Main Display Screen.


