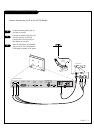
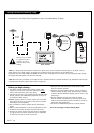
Commercial Mode Setup
PAGE 41
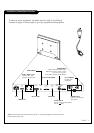
This page provides an overview of the TV configuration. See the pages listed below for more
specific, detailed instructions at each step; how to access and use the Installer menu etc.
*Note 1: Disconnect all Aux inputs. Under certain conditions, Auto Program
(Channel search) is disabled if there is an Aux input active.
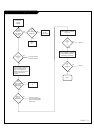
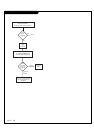
Overview: Commercial Mode Setup Procedure
1.Set Installer Menu Items
(Enter Installer Menu, see page 43 for detailed instructions.)
a. Set Installer menu item 117 FACT DEFAULT, to 001 and press ENTER.
(This clears all installer menu items, custom settings, channel labels/icons
and reloads the factory default settings.)
b. Set Item 003 BAND/AFC.
- Broadcast: set to 000.- HRC: set to 002
- CATV: set to 001. - IRC: set to 003
c. Set item 028 CH OVERIDE to 001. This allows access to Auto Program,
Channel Labels and Channel List options in the Channel Menu.
d. Set other particular installer items that affect your TV programming
network. See pages 46 - 51.
e. After all required installer menu item settings have been adjusted, press
ENTER on the remote to remove Installer Menu.
2.Set Up TV Features
(See Picture, Sound, Setup menus etc. See TV Clonable options list on page
52.) Installer Note: Some TV features will have to be set up after running
Auto Program. An example is Digital Font options. This feature is not
available until digital channels are found in the channel scan. Set up
Digital Font options after Auto Program finds a digital channel with
digital captions. Do this before running 2-5-5 + Menu.
3.Run Auto Program
(Search for all available channels.) Go to the Channel menu and access the
Auto Program option, follow on-screen instructions.
a. Edit Channel Scan. In the Channel Menu, access the Channel List menu.
• Delete channels per your system requirements: do you want to delete any
free channels so the guest cannot access them?
• Add familiar Channel Icons like ABC, CBS, NBC etc. to the channel on-
screen display. Add identifiable labels for the end user to readily know what
common networks are available. In the Channel menu, select the Channel
Label option, follow instructions on the bottom of the screen.
4. Transfer TV Setup to Controller Box: 2-5-5 + Menu
After the TV channel scan has been edited and channel label icons added,
enter the Installer menu. Once in the Installer menu, press 2-5-5 and MENU
on the remote. This transfers the TV setup to the internal controller box.
*Note: Only do 2-5-5 + MENU once or TV setup may be corrupted.
TV scans available channels and exits menu when transfer to controller is
complete.
5. Perform Adding Custom Channel Labels: 2-5-4 + Menu Mode
Enter Installer menu, press 2-5-4 and Menu. Add your own custom labels to
the channel on-screen displays. (See page 53.) To remove menu press MENU.
*Note: 2-5-4 + MENU can be performed more than once.
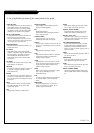
Verify TV Setup
At this point, verify that the channel lineup, channel icons and custom labels
are correct. Make sure the TV features are set per your requirements.
Set item 028 CH OVERIDE to 000 to lock the channel scan. After the
preceding has been completed, the Master TV setup is ready to be copied to
the LT2002 Clone Programmer, see next page.
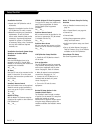
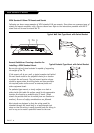
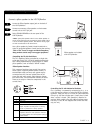
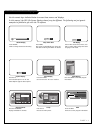
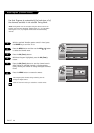
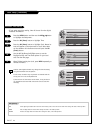
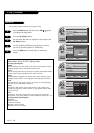
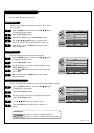
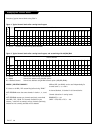
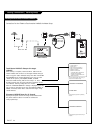
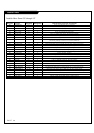
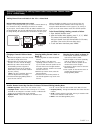
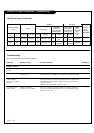
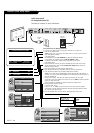
L20V54S Installer Menu
L20V54S Installer Menu Items
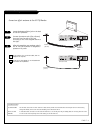
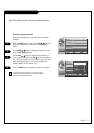
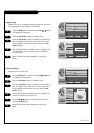
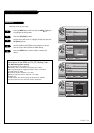
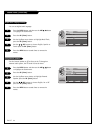
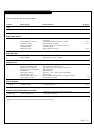
Custom Channel Label ‘WXYZ’ created in
2-5-4 + Menu Add Channel Label Mode
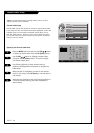
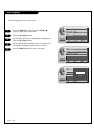
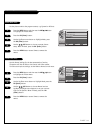
After TV setup has been verified,
set item 028 Ch Overide back to 000.
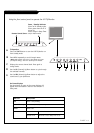
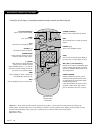
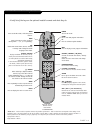
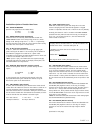
L20V54S PTC INSTALLER MENU
117 FACT DEFAULT 00X
003 BAND/AFC 00X
028 CH.OVERIDE 001
073 CH. NOT AVBLE 001
028 CH. OVERIDE 000
000 INSTALLER SEQ 000
UPN 000-000-000-000 FPGA 09F1
PTC V1.00.000 CPU V1.01.00
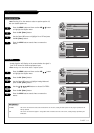
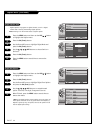
WXYZ
DIGITAL 19-3
MONO SAPSTEREO
WXYZ
ANALOG 2
MONO
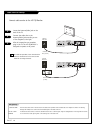
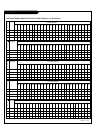
*Note: Default setting for Aux sources is to be active in the
installer menu. The Aux sources will appear between the
highest Analog and lowest Digital channel number with
Channel Up/Down. If the Aux sources will not be used, it is
advisable to set them to 000 (Off) before doing 2-5-5 + Menu.
After doing 2-5-5 + Menu, the only way to turn the Aux source
off so they will not appear in the channel scan, is to go to the
Channel Bank menus and turn each Aux source off by selecting
‘Normal Delete’.
Refer to installer items: 35, 39.