


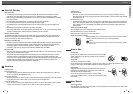


SETUP
2120
Initial Setup Initial Setup
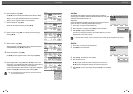
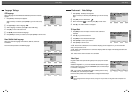
Adjust Channels
1
Follow steps 1-2 as shown under ‘Manual Set’.
2
Use […/†] to select ‘Adjust Channels‘.
3
Press [ENTER]. The ‘Adjust channels’ menu appears.
4
Use […/†] to select the PR number you want to adjust. Then press
[ENTER].
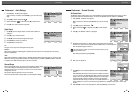
Delete
After tuning TV stations into your DVD Recorder+VCR, you may wish to delete a
station.
1
Select the PR number you want to delete using […/†].
2
Press [œ]. The selected PR will be deleted.
3
Select ‘OK’ to exit.
Edit
After tuning TV stations into your DVD Recorder+VCR, you may wish to
put a name into any channel you want to.
1
Select the PR number you want to edit using […/†].
2
Press [●]. You can put a name by pressing […/†] and [œ /√].
3
Select ‘OK’ to exit.
Sort channels
After tuning TV stations into your DVD Recorder+VCR, you may wish to change
the order of PR's you have in your set, as your preference.
1
Select the PR number you want to move using […/†].
2
Press […/†] to select the PR number you want to move to.
3
Press [ENTER]. The selected PR Will be moved to the new PR number.
4
Select ‘OK’ to exit.
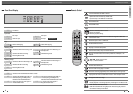
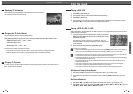
Installation
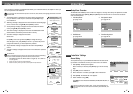
Manual Set
Auto Scan
Clock Set
•Adjust channels
Choose OK Exit
ENTER SETUP
œ √
…
†
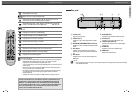
Adjust channels
Select Move
OK
Cancel
…
†
NO. NAME
PR1 BBC
PR2 P-02
PR3 P-03
PR3 P-03
PR3 P-03
PR3 P-03
œ √
…
†
ENTER
Adjust channels
OK
Cancel
…
†
NO. NAME
PR1 BBC
PR2 P-02
PR3 - -
PR3 - -
PR3 - -
PR3 - -
Auto Chapter
During recording, chapter markers are added automatically at fixed
intervals.
You can set this interval to
5 min
,
10 min
or
15 min
.
But when you set DVD Record quality “SEP”, Auto Chapter interval could be
set only ‘10 min’ or ‘15 min’.
To turn off automatic chapter marking, select ‘
Off
‘.
Follow the same procedure as ‘DVD Record Quality’.
DVD Record Quality
You can set the default DVD recording quality to: HQ (High Quality - 1
hr/disc), SP (Standard Quality - 2 hrs/disc), EP (Extended Play - 4 hrs/disc) or
SEP (Very Low Quality - 8 hrs/disc).
1
Press [SETUP]. The Setup menu appears.
While ‘Init Setup‘ is selected, press [ENTER] to go to the initial setup
page.
2
Use [œ/√] to select ‘Recording Options ‘.
3
While ‘Recording Options ‘ is selected, press [†] to select ‘DVD Quality‘.
4
Press [√] to move to the second level.
5
Use […/†] to to select the desired Record Quality (
HQ
,
SP
,
EP
or
SEP
).
6
Press [ENTER] to confirm your selection, then press [SETUP] to exit the menu.
VCR Record Quality
You can set the default VCR recording quality to SP (Standard Play) or LP
(Long Play). SP is higher quality, but LP provides 2 times the recording time;
e.g., a 2 hour tape will record for 4 hours in LP mode.
Follow the same procedure as the ‘DVD Record Quality’.
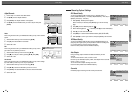
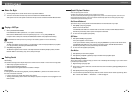
‘Recording Options’ Settings
Recording Options
•DVD Quality HQ
VCR Quality SP
Auto Chapter EP
Overwrite SEP
Choose OK Exit
ENTER SETUP
œ √
…
†
Recording Options
DVD Quality
•VCR Quality SP
Auto Chapter LP
Overwrite
Choose OK Exit
ENTER SETUP
œ √
…
†
Recording Options
DVD Quality
VCR Quality
•Auto Chapter Off
Overwrite 05 min
10 min
15 min
Choose OK Exit
ENTER SETUP
œ √
…
†
Recording Options
DVD Quality
VCR Quality
Auto Chapter
Overwrite •On
Off
Choose OK Exit
ENTER SETUP
œ √
…
†
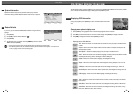
Overwrite
Immediately begins recording over the currently selected title.
Delete Edit
Move Confirm
…†
ENTER
œ
●
Label
Input digits Backspace Select
Prev Page Next Page
§ ∞
œœ
0-9
Clear
OK
Cancel
œ √
…
†
- - - -
a b c d e f g h i
j k l m n o p q r
Space s t u v w
x y z _ - Backspace
A’ a Symbol