INTRODUCTION
1110
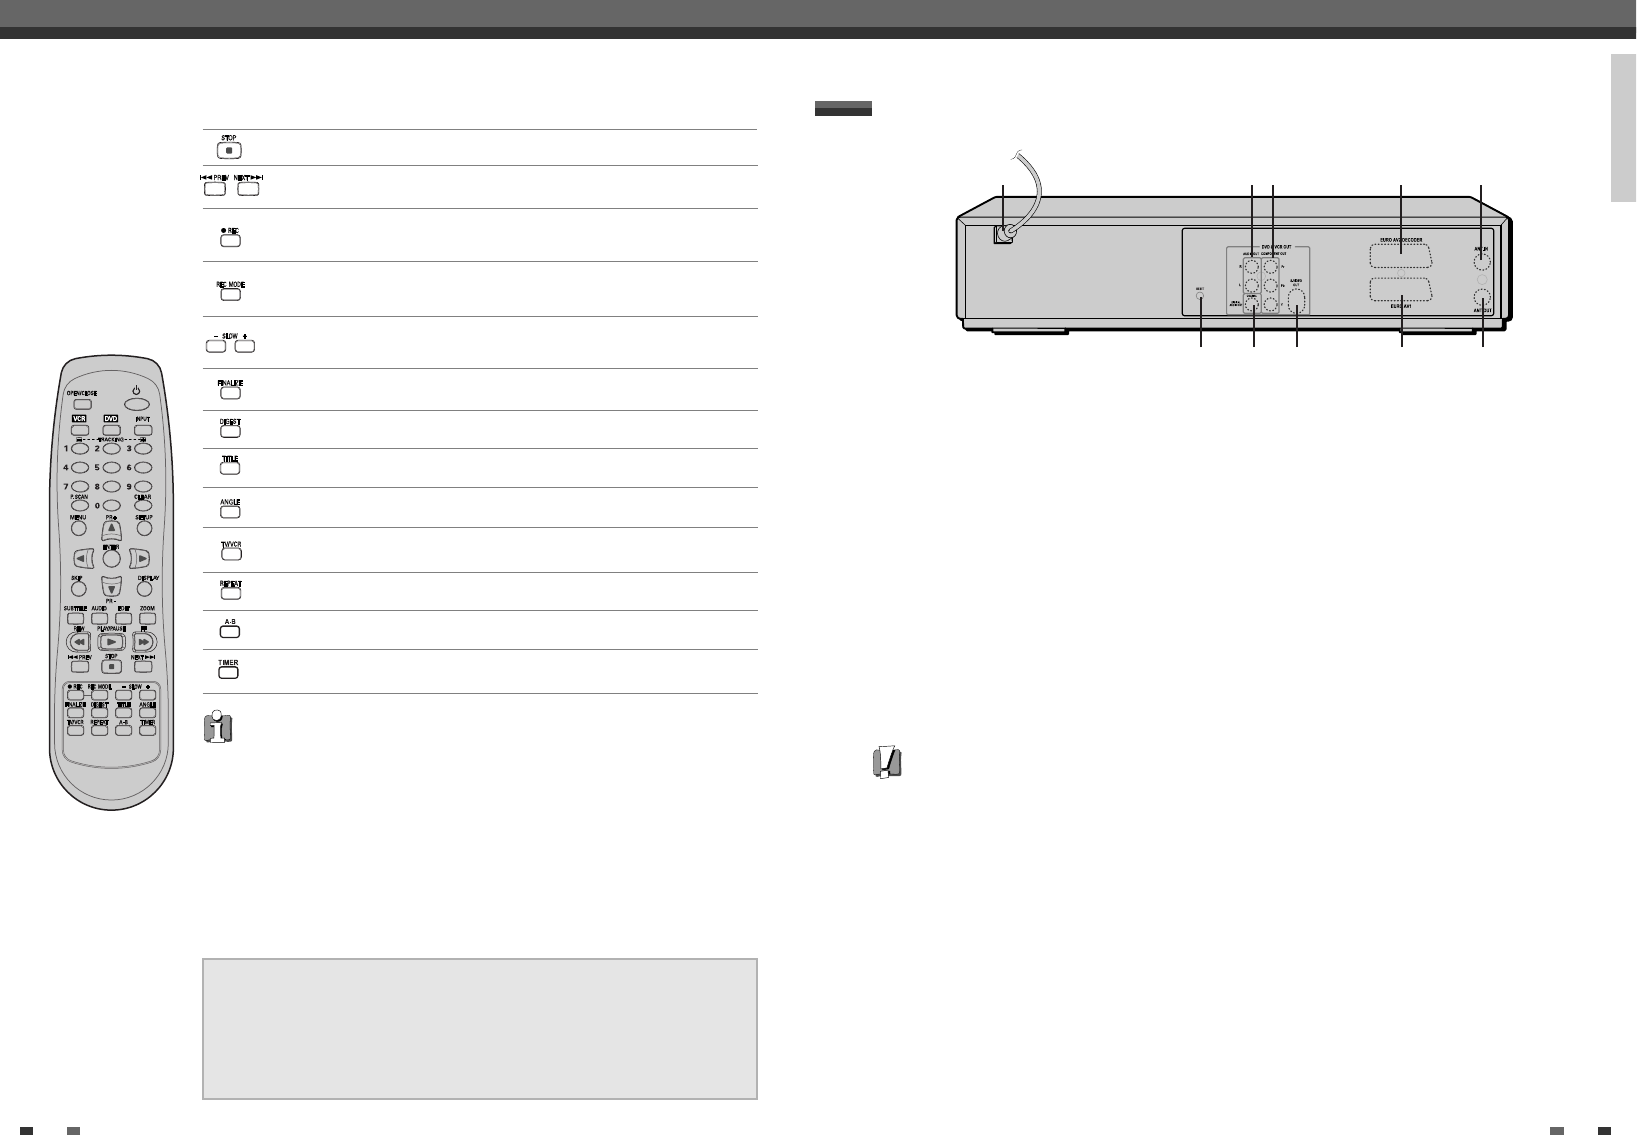
Rear panel
Identification of Controls
!
AC Power Cord
Plug into a power outlet.
@
AUDIO OUT (L, R)
Connect to a TV or other equipment with audio
inputs.
#
COMPONENT/PROGRESSIVE VIDEO OUT (Y Pb Pr)
Connect to a TV with Component Video (Y Pb Pr)
inputs.
$
Scart socket 2
Connection of an additional device (satellite
receiver, set-top box, video recorder, camcorder,
etc.)
%
Scart socket 1
Connection of a TV set. Composite-output and
RGB-output
^
RF IN (FROM ANT.)
Connect to your antenna or cable TV outlet.
&
RF OUT (TO TV)
Connect to a TV with an RF coaxial input.
*
COAXIAL (Digital Audio Out)
Connect to an amplifier with a coaxial digital
audio input.
(
S-VIDEO OUT
Connect to a TV with an S-Video Input.
)
RESET Button
Recover from system down.
Caution
• Do not touch the inner pins of the jacks on the rear panel. Electrostatic discharge may cause permanent damage
to the DVD Recorder+VCR.
! @# $ ^
* () % &
Displays a disc’s Title menu, if available.
Selects Recording mode: - DVD ; Approx 1 Hour (HQ mode), 2 Hours (SP
mode), 4 Hours (EP mode), 8 Hours (SEP mode) - VCR : SP or LP.
Selects a DVD camera angle, if available.
Starts recording. Press repeatedly to set the recording time. For more
details, Refer to One Touch Record (OTR) on page 40.
Displays the finalize menu for DVD+R discs.
Displays the digest menu for DVD+RW/+R discs.
Repeats the current chapter, track, title or the entire disc.
Repeats playback between two points (A and B).
Displays the Timer Recording menu.
Switches between the DVD Recorder+VCR tuner and your TV tuner.
Increases or decreases the slow motion speed when playing a DVD or VHS
tape.
Identification of Controls
Skips to the next or previous chapter/track.
Progressive Scan Mode
• If your TV supports Progressive Scan, you can view high quality video by setting the
DVD Recorder+VCR to Progressive Scan mode. If your TV does not support
Progressive Scan, do NOT change to Progressive Scan mode.
If you do so accidentally, press and hold the [P.SCAN] button for 3 seconds to restore
normal viewing.
• When video output mode is changed from RGB to Interlace or Progressive (Scart 1)
will not be correct colour for Component video.
• As component outputs have their own Jacks on the back side, change the TV input
into Component input, after connecting the component cables from the DVD
Recorder+VCR to TV.
• Changing from Interlace or Progressive to RGB, should be the opposite of above.
Stops playback or recording.
CONSUMERS SHOULD NOTE THAT NOT ALL HIGH DEFINITION TELEVISION SETS
ARE FULLY COMPATIBLE WITH THIS PRODUCT AND MAY CAUSE ARTIFACTS TO
BE DISPLAYED IN THE PICTURE. IN CASE OF 525 PROGRESSIVE SCAN PICTURE
PROBLEMS, IT IS RECOMMENDED THAT THE USER SWITCH THE CONNECTION
TO THE 'STANDARD DEFINITION' OUTPUT. IF THERE ARE QUESTIONS REGARDING
OUR TV SET COMPATIBILITY 'WITH THIS MODEL 525p DVD PLAYER, PLEASE
CONTACT OUR CUSTOMER SERVICE CENTER.


