


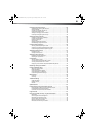

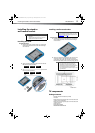
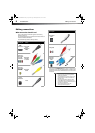

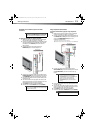
TV components
7
DX-60D260A13
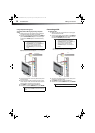
Remote control
HDMI1/DVI
HDMI2/ARC
HDMI3
Connect HDMI devices to these jacks. For
more information, see “Using HDMI
(best)” on page 9.
If you are connecting a DVI device,
connect the video for a DVI device to the
HDMI1/DVI. For more information, see
“Using DVI (same as HDMI but requires an
audio connection)” on pages 10.
If you are connecting a home theater
system, we recommend that you connect
it to the HDMI2/ARC jack.
USB
Connect a USB flash drive to this jack to
view compatible JPEG picture files. For
more information, see “Connecting a USB
flash drive” on page 16 and “Using a USB
flash drive” on page 36.
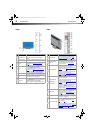
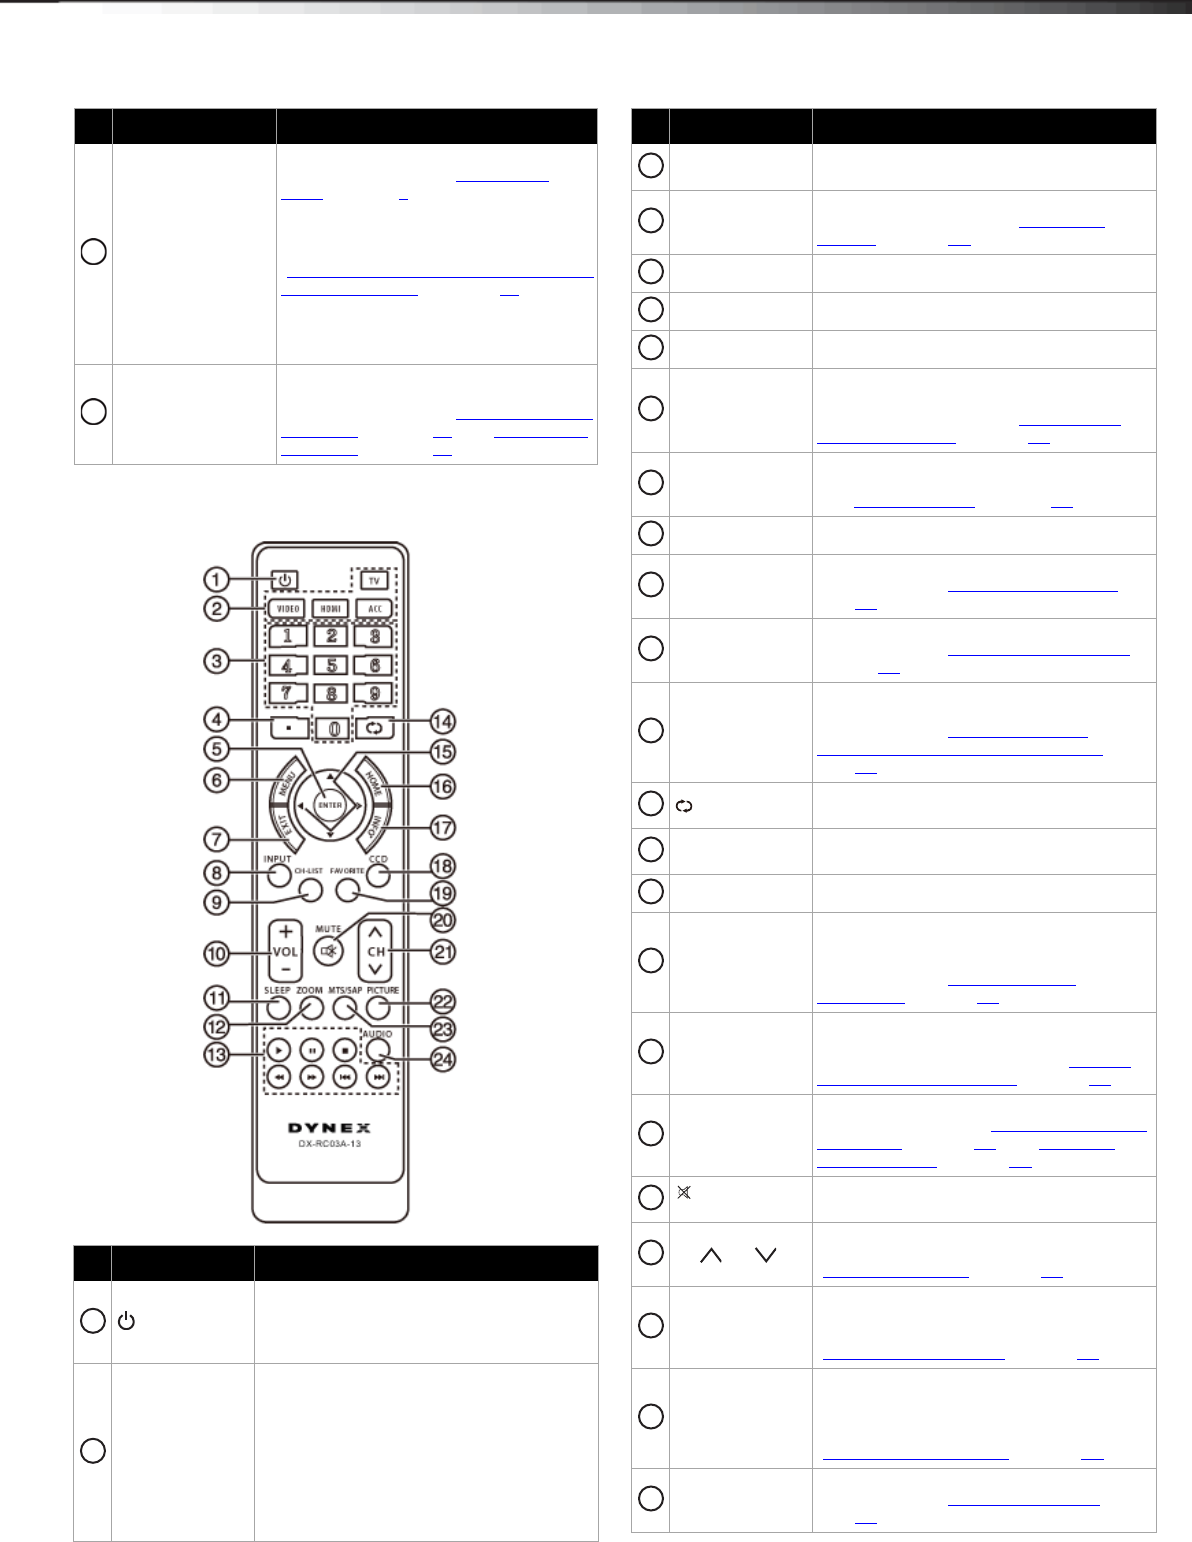
# Button Description
(Power)
Press to turn your TV on or off (Standby
mode). WARNING: When your TV is off,
power still flows into it. To disconnect power,
unplug the power cord.
Video Input
Press to select the input source.
•Press TV to select TV.
•Press HDMI one or more times to select
the device connected to the HDMI1/DVI,
HDMI2/ARC, or HDMI3 jack.
•Press VIDEO to select the device
connected to the AV or Component IN
jacks.
• ACC has no function.
# Item Description
8
9
1
2
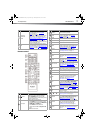
Numbers
Press to enter channel numbers and the
parental control password.
. (Dot)
Press to enter a digital sub-channel number.
For more information, see “Selecting a
channel” on page 21.
ENTER Press to confirm selections or changes.
MENU Press to open the on-screen menu.
EXIT Press to close the on-screen menu.
INPUT
Press to open the INPUT SOURCE list, then
press
or to select a video input source.
For more information, see “Selecting the
video input source” on page 20.
CH-LIST Press to open the channel list. Hidden
channels are grayed and cannot be selected.
See “Hiding channels” on page 25.
VOL+/VOL– Press to increase or decrease the volume.
SLEEP
Press to set the sleep timer. For more
information, see “Setting the sleep timer
” on
page 33.
ZOOM
Press to select the aspect ratio. For more
information, see “Adjusting the TV picture
”
on page 22.
Media control
Press these buttons to control playback from
an HDMI-CEC compatible device. For more
information, see “Displaying a list of
INlink-compatible (HDMI-CEC) devices” on
page 36.
(recall)
Press to go to the last viewed channel. In USB
mode, press to return to a higher level folder.
Press to navigate through the on-screen
menus and adjust settings.
Home Press to open the on-screen menu.
INFO
Press to display TV status information, such
as the channel number, channel name (if
available), or signal source. For more
information, see “Viewing channel
information” on page 21.
CCD
Press to turn closed captioning on or off. You
can select CC On, CC Off, or CC On When
Mute. For more information, see “Turning
closed captioning on or off” on page 30.
FAVORITE
Press to open the Favorites channel list. For
more information, see “Setting up a favorite
channel list” on page 25 and “Viewing a
favorite channel” on page 26.
MUTE
Press to mute the sound. Press again to
restore the sound.
CH /CH
Press to go to the next or previous channel in
the channel list. For more information, see
“Selecting a channel
” on page 21.
PICTURE
Press to select the picture mode. You can
select Vivid, Standard, Energy Savings, or
Custom. For more information, see
“Adjusting the TV picture
” on page 22.
MTS/SAP
In analog TV mode, press to select Stereo,
Mono, or SAP. In digital TV mode , press to
select an alternate audio language, if
available. For more information, see
“Adjusting sound settings
” on page 23.
AUDIO
Press to select the sound mode. for more
information, see “Adjusting the sound” on
page 23.
# Button Description
3
4
5
6
7
8
9
10
11
12
13
14
15
16
17
18
19
20
21
22
23
24
12-1236_DX-60D260A13 MAN_V1_EN.book Page 7 Thursday, March 21, 2013 8:17 AM