


Installing the stand or wall-mount bracket
5
DX-60D260A13
Installing the stand or
wall-mount bracket
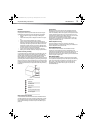
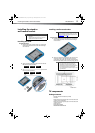
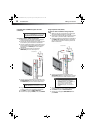
Installing the stand
To install the stand:
1 Carefully place your TV face-down on a cushioned,
clean surface to protect the screen from damages
and scratches.
2 Secure the stand column to the stand with the four
M4 (20 mm) screws provided.
3 Attach the stand assembly to the TV using the six M4
(16 mm) screws provided.
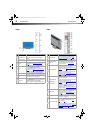
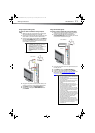
Installing a wall-mount bracket
To attach your TV to a wall-mount bracket:
1 Carefully place your TV face-down on a cushioned,
clean surface to protect the screen from damages
and scratches.
2 Attach the wall-mount bracket to your TV using the
mounting holes on the back of your TV. See the
instructions that came with the wall-mount bracket
for information about how to correctly hang your TV.
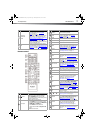
TV components
Package contents
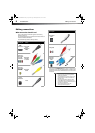
• Remote control and batteries (2 AAA)
•TV stand
• M4 type (20 mm length) (4 pcs) to connect the stand
column to the stand base.
• M4 type (16 mm length) (6 pcs) to connect the stand
column to the TV.
•Stand column
• QUICK SETUP GUIDE
•IMPORTANT INFORMATION
Notes
• If you plan to wall-mount your TV, do not install
the stand.
• Store the stand and stand screws in case you
decide to use the stand in the future.
Screw type Screw length # of screws
M4 20 mm 4
Screw type Screw length # of screws
M4 16 mm 6
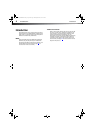
Warning
This TV is intended to be supported by a UL Listed
wall mount bracket with suitable weight/load. (See
“Miscellaneous
” on page 42.)
Note
• The length of the wall-mount screws vary
depending on the wall-mount bracket you
purchased. See the instructions that came with
the wall-mount bracket for screw lengths.
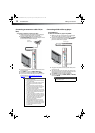
• The mounting holes on the back of your TV take
type M6 screws.
15.75 in. (400 mm)
15.75 in. (400 mm)
Wall-mount brackets
12-1236_DX-60D260A13 MAN_V1_EN.book Page 5 Thursday, March 21, 2013 8:17 AM