


Extron USA - West
Headquarters
+800.633.9876
Inside USA/Canada
Only
+1.714.491.1500
+1.714.491.1517 FAX
Extron USA - East
+800.633.9876
Inside USA/Canada
Only
+1.919.863.1794
+1.919.863.1797 FAX
Extron Europe
+800.3987.6673
Inside Europe Only
+31.33.453.4040
+31.33.453.4050 FAX
Extron Asia
+800.7339.8766
Inside Asia Only
+65.6383.4400
+65.6383.4664 FAX
Extron Japan
+81.3.3511.7655
+81.3.3511.7656 FAX
Extron China
+400.883.1568
Inside China Only
+86.21.3760.1568
+86.21.3760.1566 FAX
Extron Middle East
+971.4.2991800
+971.4.2991880 FAX
© 2010 Extron Electronics. All rights reserved. www.extron.com
Installation Checklist
Installation of the TLP 700MV and TLP 700TV can be divided into five main sections:
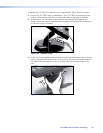
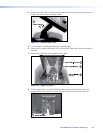
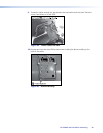
Step 1 — Mount the TouchLink panel (select one option):
Rack mount the TLP 700MV (page 38).
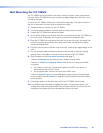
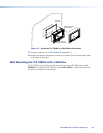
Wall mount the TLP 700MV with (page 40) or without (page 39) an Extron wall box.
Mount the TLP 700TV on a desktop (page 41).
VESA mount the TLP 700TV (page 45).
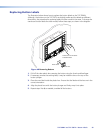
If required, replace the buttons on the front panel (see page 49).
Step 2 — Connect the power, network, and video cables, (select one option):
Cable the TLP 700MV (page 6).
Cable the desk-top mounted TLP 700TV (page 9).
Cable the VESA mounted TLP 700TV (see the user guide for VESA mount kit online at
www.extron.com).
Step 3 — Initial configuration with internal on-screen menus:
Configure the TouchLink Panel, using the on-screen menus (page 11).
Carry out Touch Screen calibration (page 14).
Step 4 — Install and update software:
Connect a PC to same network as the TouchLink Panel (for PC requirements, see page 3)
Connect an IP Link controller to the same network (for a list of suggested models, see
page 3).
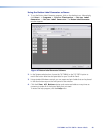
Install GUI Configurator and Global Configurator on the PC (page 16).
Step 5 — Design and configure graphical user interface:
Use GUI Configurator to design a new graphical user interface project for the
TouchLink Panel (see page 21 and the GUI Configurator help file).
Save and upload the project to the TouchLink Panel (see page 24).
Create a new Global Configurator project for the IP Link controller (see page 26 and
Global Configurator help file).
In Global Configurator, import and configure the GUI Configurator project (see
page 29 and Global Configurator help file).