


15
ENGLISH
INITIAL SETUP
----------------------------------------------------------------------------------------------------------------------
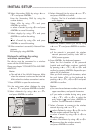
6 Select »IP address« by using »A« or »S«
and press »ENTER«.
Enter the IP address by using the number but-
tons.
Select »Ok« by using »S« and press
»ENTER« to confirm,
or select »Cancel« by using »s« and press
»ENTER« to cancel the setting.
7 Select »Subnet Mask« by using »A« or »S«
and press »ENTER«.
Enter the Subnet Mask by using the number
buttons.
Select »Ok« by using »S« and press
»ENTER« to confirm,
or select »Cancel« by using »s« and press
»ENTER« to cancel the setting.
8 Select »Gateway« by using »A« or »S«
and press »ENTER«.
Enter the Gateway address by using the
number buttons.
Select »Ok« by using »S« and press
»ENTER« to confirm,
or select »Cancel« by using »s« and press
»ENTER« to cancel the setting.
Note:
7
The primary and secondary DNS (Domain
Name System) in the next setting are the
network adresses of the server allocated by
the provider.
9 Select »Primary DNS« by using »A« or
»S« and press »ENTER«.
Enter the Primary DNS by using the number
buttons.
Select »Ok« by using »S« and press
»ENTER« to confirm,
or select button »Cancel« by using »s« and
press »ENTER« to cancel the setting.
Network settings by using
wired connection
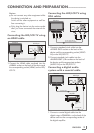
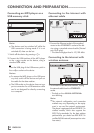
The device must be connected to a wired router
with an ethernet cable.
Please see chapter "CONNECTION AND PREP-
ARATION".
1 Press »SETUP« to open the main menu.
2 In the main menu select »Settings« by using
»A« or »S« and press »ENTER« to con-
firm.
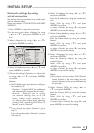
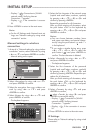
3 Select »Network« by using »A« or »S«
and press »ENTER« to confirm.
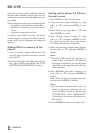
Settings
Parental
System
Network
Interface
Link Status
MAC Adress
IP Mode
IP Adress
Subnet Mask
Gateway
Primary DNS
Secondary DNS
Signal Strength
Network Name (SSID)
Wired
Link Down
00:22:84:fb:c 6c:65
Manual
0.0.0.0
0.0.0.0
0.0.0.0
0.0.0.0
0.0.0.0
Good
grinternet
Display
Audio
Language
Network
BD-Live
4 Select »IP Mode« by using »A« or »S« and
press »ENTER« to confirm.
5 Choose the setting (»Dynamic« or »Manual«)
by using »A« or »S« and press »ENTER«
to confirm.
Notes:
7
The IP Mode option provides two configura-
tion modes for IP:
– Dynamic – Enables DHCP, the addresses
are automatically assigned by the router.
– Manual – Requires user to config-
ure network settings such as IP ad-
dress, subnet mask, gateway, etc.
It is able to show subnet mask, gateway,
primary DNS, secondary DNS when "IP
Mode" is set as "Manual".
7
If you choose the option "Dynamic", go to
step 11.
If you choose the option "Manual", continue
with step 6).