60 Intel® Server Chassis SC5400 User’s Guide
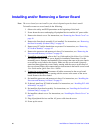
Installing and/or Removing a Server Board
Note: The server board you can install in your chassis depends upon the chassis model.
To install or remove a server board, do the following:
1. Observe the safety and ESD precautions at the beginning of this book.
2. Power down the server and unplug all peripheral devices and the AC power cable.
3. Remove the chassis cover. For instructions, see “Removing the Chassis Cover” on
page 16.
4. Remove the front bezel assembly if it is installed. For instructions, see “Removing
the Bezel Assembly (Pedestal Only)” on page 18.
5. Remove any PCI add-in boards that are present. For instructions, see “Removing
PCI Add-in Board(s)” on page 45.
6. Remove the processor and memory air ducts. For instructions, see “Removing the
Processor and Memory Air Ducts” on page 20.
7. If installing a server board
, refer to the User Guide and/or Quick Start User’s Guide
that shipped with your Intel® server board for installation instructions. Use the
mounting screws, bumpers and standoffs (if necessary) that came with your chassis
to secure the server board to the chassis. Make sure the server board is properly
seated and then tighten the screws firmly, starting with the screws at the center of
the server board. Make cable connections per instructions in the Intel® server board
User Guide and/or Quick Start User’s Guide.
8. If removing a server board
, disconnect all cables connected to the server board.
Remove the mounting screws, starting with the screws at the center of the server
board. Remove the server board.
9. Re-install the processor and memory air ducts. For instructions, see “Installing the
Processor and Memory Air Ducts” on page 21.
10. If desired, install any PCI Add-in boards. For instructions, see “Installing PCI Add-
in Board(s)” on page 47.
11. Re-install the front bezel assembly. For instructions, see “Installing the Front Bezel
(Pedestal Only)” on page 19.
12. Re-install the chassis cover. For instructions, see “Installing the Chassis Cover” on
page 17.
13. Plug all peripheral devices and the AC power cable into the server.
14. Power up the server.


