


Masterpage:Right+
EN 63
Filename [DR-MV1SEK_08Navigation.fm]
Page 63 April 15, 2004 1:26 pm
NAVIGATION (DVD DECK ONLY)
8 Press we to select “PREVIEW”, then press ENTER to preview
the play list.
9 Press we to select “EXECUTE”, then press ENTER. The play
list is created.
To modify the points
A Press we to select “CLEAR”, then press ENTER.
B Repeat steps 5 – 9 as necessary.
10 Press NAVIGATION to return to the normal screen.
NOTES:
● There may be a discrepancy of several seconds between the scene
you intend to edit, and the scene which is actually edited.
● The title, index and category of the play list can be modified in the
same way as “ORIGINAL”. (੬ pg. 60)
● You can modify the play list that has just been created here by
adding, moving, or deleting unwanted parts to create a digest edition,
etc.
Add Scenes To A Play List
1 Perform steps 1 to 3 of “Create Play List” (੬ pg. 62) before
continuing.
2 Press we to select the play list to which you wish to add a
scene, then press t.
3 Press we to select “EDITING”, then press ENTER.
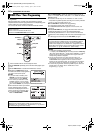
4 Press we to select “ADD
SCENE”.
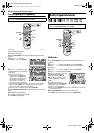
5 Press 4 to start playback. The
playback pictures appear in the
window on the screen. The
elapsed playing time starts
counting with the arrow on “IN”.
● To locate the beginning of other
titles, press 2/6.
6 Find the point where you want the added scene to begin, then
press ENTER with the arrow on “IN”. The edit-in time is fixed and
the elapsed playing time starts counting again.
7 Find the point where you want the added scene to end, then
press ENTER with the arrow on “OUT”. The edit-out time is fixed.
● Press 3, 4, 5, 2, 6 or 9 to find the edit-in and edit-out
points.
8 Press we to select “PREVIEW”, then press ENTER to preview
approximately 5 seconds before and after the edited scene.
9 Press we to select “EXECUTE”, then press ENTER. The
selected scene is added.
To modify the points
A Press we to select “CLEAR”, then press ENTER.
B Repeat steps 5 – 8 as necessary.
10 Press NAVIGATION to return to the normal screen.
NOTE:
There may be a discrepancy of several seconds between the scene you
intend to edit, and the scene which is actually edited.
Move Scenes
1 Perform steps 1 to 3 of “Create Play List” (੬ pg. 62) before
continuing.
2 Press we to select a play list into which you wish to move a
scene, then press t.
3 Press we to select “EDITING”, then press ENTER.
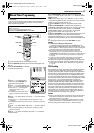
4 Press we to select “MOVE
SCENE”.
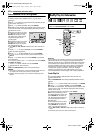
5 Press 4 to start playback. The
playback pictures appear in the
window on the screen. The
elapsed playing time starts
counting with the arrow on “IN”.
● To locate the beginning of other
titles, press 2/6.
6 Find the point where you want the moved scene to begin, then
press ENTER with the arrow on “IN”. The edit-in time is fixed and
the elapsed playing time starts counting again.
7 Find the point where you want the moved scene to end, then
press ENTER with the arrow on “OUT”. The edit-out time is fixed.
8 Press 4 to start playback.
9 Find the point where you want the moved scene to be moved,
then press ENTER with the arrow on “MOVE TO”.
● Press 3, 4, 5, 2, 6 or 9 to find the edit-in, edit-out and
move-to points.
10 Press we to select “PREVIEW”, then press ENTER to
preview the part approximately 5 seconds before and after the
point to which the scene has been moved.
11 Press we to select “EXECUTE”, then press ENTER. The
selected scene is moved.
To modify the points
A Press we to select “CLEAR”, then press ENTER.
B Repeat steps 5 – 11 as necessary.
12 Press NAVIGATION to return to the normal screen.
NOTE:
There may be a discrepancy of several seconds between the scene you
intend to edit, and the scene which is actually edited.
DR-MV1SEK_00.book Page 63 Thursday, April 15, 2004 3:30 PM