


Filename [DR-MV1SU_10Subsidiary.fm]
Masterpage:Left+
74 EN
Page 74 March 4, 2004 3:51 pm
SUBSIDIARY SETTINGS
VIDEO IN/OUT
8 MONITOR TYPE — 4:3LB / 4:3PS / 16:9 AUTO / 16:9 FIX
You can select the monitor type depending on the TV used when
you play back DVD VIDEO discs recorded for wide-screen TVs. For
details, refer to “Monitor Set (DVD Deck Only)” (੬ pg. 24).
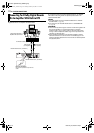
8 FRONT AUX F-1 — VIDEO / S-VIDEO
Select the appropriate mode depending on the connector (F-1)
being used on the front panel.
VIDEO: To use the VIDEO input connector on the front panel.
S-VIDEO: To use the S-VIDEO input connector on the front panel.
8 REAR AUX L-1 — VIDEO / S-VIDEO
Select the appropriate mode depending on the connector (L-1)
being used on the rear panel.
VIDEO: To use the VIDEO INPUT connector on the rear panel.
S-VIDEO: To use the S-VIDEO INPUT connector on the rear panel.
RECORDING SET
8 SAVE AS LIBRARY — OFF / ON
When this function is set to “ON”, the recording information is
automatically stored in the library. For details, refer to “Modify
Library Information” (੬ pg. 60).
8 XP MODE REC AUDIO — DOLBY DIGITAL / LINEAR PCM
You can select the audio format when you record a program in XP
mode. When this function is set to “LINEAR PCM”, you can obtain
a high-quality audio sound.
DOLBY DIGITAL: To record in Dolby Digital format.
LINEAR PCM: To record in Linear PCM format.
8 2ND AUDIO RECORD — OFF /ON
When this function is set to “ON”;
If a SAP program is received, the SAP audio is recorded on L/R
tracks. The main audio is not recorded.
If a non-SAP program is received, the main audio is recorded on L/
R tracks.
When this function is set to “OFF”, the SAP audio cannot be
recorded.
NOTE:
When the channel is changed on the unit;
● The “MONO” indicator appears on the screen for about 5 seconds if
the program is a monaural broadcast.
● The “STEREO” indicator appears on the screen for about 5 seconds
if the program is a stereo broadcast.
● Both “STEREO” and “SAP” indicators appear when a stereo program
is accompanied by SAP sound.
● Both “MONO” and “SAP” indicators appear when the main audio on
the monaural broadcast is accompanied by SAP sound.
DISPLAY SET
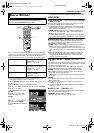
8 SUPERIMPOSE — OFF / AUTO
When this function is set to “AUTO”, various operational indicators
appear on the TV screen. Messages appear in the selected
language. (੬ pg. 19)
OFF: To turn off superimposed indications.
AUTO: To superimpose operational indications for approximately
five seconds just after the corresponding operation.
NOTES:
● Even when “SUPERIMPOSE” is set to “OFF”, you can display the
various operational indicators by pressing ON SCREEN. To clear the
operational indicators, press ON SCREEN again.
● When you use this unit as the source player for editing, be sure to set
“SUPERIMPOSE” to “OFF” before starting. (
੬ pg. 74)
● When you select “AUTO”, during playback, the operation mode
indicators may be disturbed depending on the type of disc being
used.
8 GRAY BACK — OFF / ON
When this function is set to “ON”, the TV screen becomes all grey
when receiving a channel not in use.
NOTE:
When you want to receive an unstable channel with poor signals, set
this function to “OFF”.
8 DIMMER — BRIGHT / DIM
You can change the brightness of the front display panel.
BRIGHT: Normally select this.
DIM: To dim the front display panel. (Blue lamp on the front display
panel is turned off.)
8 POWER SAVE — OFF / ON
When this function is set to “ON”, you can reduce the power
consumption while the unit is turned off.
NOTES:
● During Power Save mode —
— the front display panel will be turned off.
● Power Save does not work when —
— the unit is in the Timer mode.
— the unit’s power is turned off after timer-recording or Instant Timer
Recording.
— the Automatic Satellite Program Recording mode is engaged.
(
੬ pg. 46)
● It takes some time for the unit to complete initialisation after you turn
on unit power, with “WAKE UP” blinking on the front display panel.
8 ON SCREEN LANGUAGE
This unit offers you the choice to view on-screen messages in 3
different languages.
For details, refer to “On-screen Language Set” (੬ pg. 19).
OTHERS
8 RESUME — ON / OFF / DISC RESUME
When this function is set to “ON” or “DISC RESUME”, you can use
the resume function. (੬ pg. 27)
ON: You can start playback from the resume point of the placed
disc.
OFF: You cannot use the resume function.
DISC RESUME: The unit retains a memory of the resume points of
the last 30 discs played back, even though they have been
ejected.
NOTE:
“DISC RESUME” setting works on DVD VIDEO, VCD and already
finalised DVD-R/DVD-RW (video mode) discs. For other types of discs,
the function under “ON” setting will be applied even if “RESUME” is set
to “DISC RESUME”.
DR-MV1SU_10Subsidiary.fm Page 74 Thursday, March 4, 2004 3:51 PM