


28 EN
PLAYBACK AND RECORDING FEATURES (cont.)
123
456
7
89
0
2
4
1
3
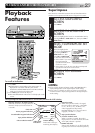
JOG
SHATTLE
+
−
OK
MENU
MENU
OK
TIME SCAN
CH
AUDIO MONITOR
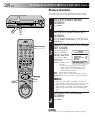
Picture Control
This feature helps you to adjust the playback picture quality
according to your preference. *The default setting is "AUTO."
ACCESS MAIN MENU
SCREEN
1
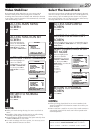
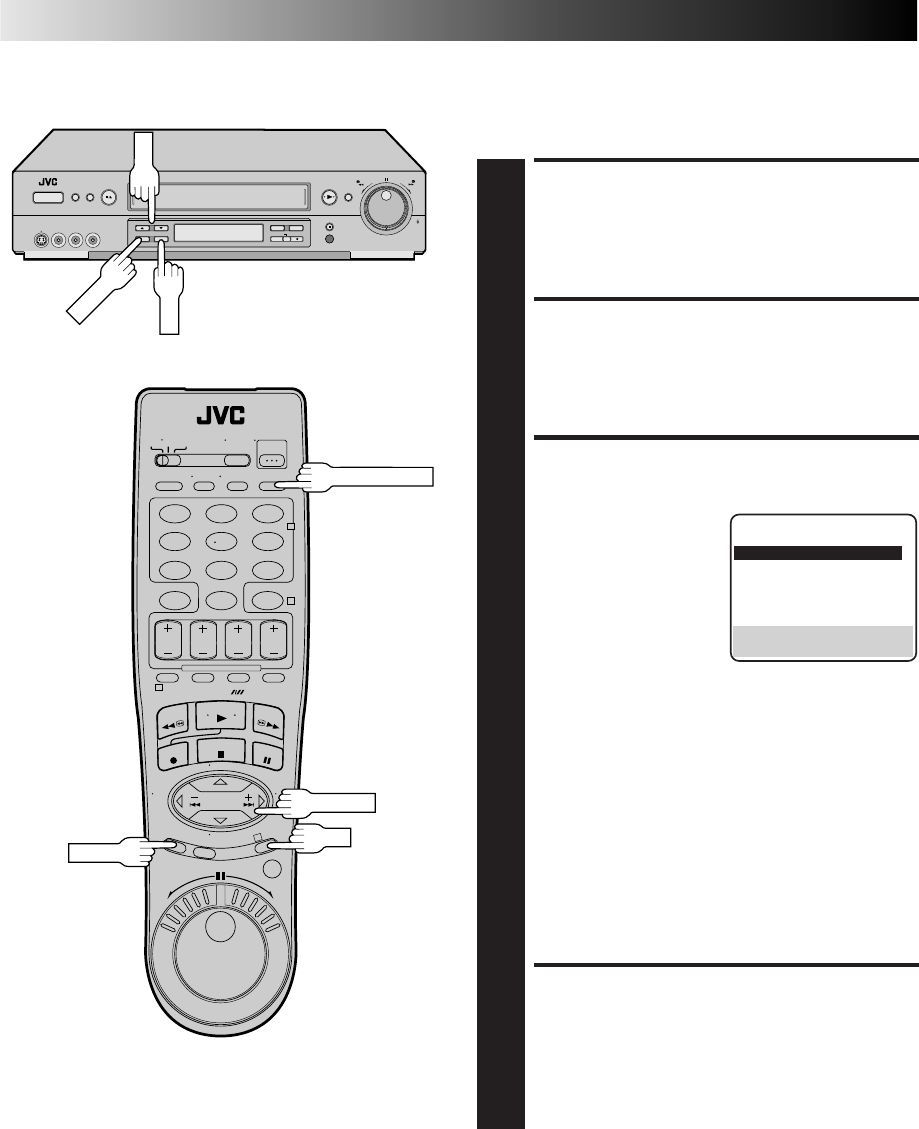
Press MENU.
ACCESS FUNCTION SET
SCREEN
2
Move the highlight bar (arrow) to "FUNCTION SET" by
pressing CH
5
∞
or TIME SCAN
%
fi
, then press OK or
TIME SCAN
#
.
SELECT PICTURE CONTROL
SET MODE
3
Move the highlight bar
(arrow) to "PICTURE
CONTROL" by pressing
CH
5
∞
or TIME SCAN
%
fi
, then press OK or
TIME SCAN
#
to select the
desired mode.
AUTO*:Normally select
"AUTO".
It automatically adjusts the picture quality.
* When "VIDEO CALIBRATION" is set to
"OFF" (੬ pg. 35), you can only select
NORM instead of AUTO.
EDIT: Select when you dub tapes.
SOFT: Select when you want to soften the picture.
SHARP: Select when you want to sharpen the picture.
NOTE:
• When you select "EDIT", "SHARP" or "SOFT", the
selected mode will not change until you select again.
• When you select "EDIT" to dub tapes, be sure to
select "AUTO" (or "NORM" when "VIDEO CALIBRA-
TION" is set to "OFF") after you finish dubbing the
tapes.
RETURN TO NORMAL
SCREEN
4
Press MENU.
NOTE:
Select "EDIT" when you are dubbing tapes. Refer to page 56.
FUNCTION
VIDEO CALIBRATION ON
=PICTURE CONTROL AUTO
AUTO TIMER OFF
SUPERIMPOSE ON
AUTO SP
=EP TIMER OFF
DIGITAL R3 ON
NEXT PAGE
SELECT WITH (5,∞) AND (OK)
PRESS (MENU) TO END