


6 EN
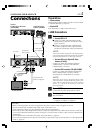
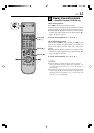
S-VIDEO/VIDEO Connections
First follow Preparations on page 5, then go to the following
steps.
1
Make connections
— Connect VCR to TV
Refer to 1 ‘Connect VCR to TV’ on page 5.
— Connect VCR to the Digital HD Video
Camera (JY-HD10)
Connect an audio/S-video cable between the
VCR’s [AUDIO/S VIDEO IN] connectors and JY-
HD10’s [S/AV] connectors.
— Connect VCR to another VCR (SR-VD400E)
Connect an audio/S-video cable between the
playback VCR’s [AUDIO/S VIDEO OUT]
connectors and the recording VCR’s [AUDIO/
S VIDEO IN] connectors.
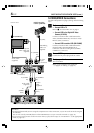
2
Connect VCR to power source
Connect the AC power plug to the AC outlet.
3
Final preparation for use
Turn on the VCR.
● You can now perform ‘basic playback’
(੬ page 8) or ‘editing’ (੬ page 18).
S400
DV IN
i.LINK IN/OUT
DIGITAL OUT
OPTICAL
PCM/DOLBY DIGITAL
REMOTE PAUSE/
AV COMPULINK
R
Y
L
P
B
/C
B
VIDEO
P
R
/C
R
S VIDEO
S VIDEO
AUDIO
IN
(L-1)
IN
(L-2)
RL
VIDEO
AUDIO
OUT
IN
S400
DV IN
i.LINK IN/OUT
DIGITAL OUT
OPTICAL
PCM/DOLBY DIGITAL
REMOTE PAUSE/
AV COMPULINK
R
Y
L
P
B
/C
B
VIDEO
P
R
/C
R
S VIDEO
S VIDEO
AUDIO
IN
(L-1)
IN
(L-2)
RL
VIDEO
AUDIO
OUT
IN
Another D-VHS Digital Recorder (SR-VD400E)
Audio cable
(supplied)
To
[AUDIO
OUT]
To [AUDIO
IN]
To [S VIDEO
OUT]
To [S VIDEO
IN]
S-video
cable
(supplied)
Back of VCR
[AUDIO OUT]
Audio cable
(supplied)
Component
Video Cable (not
supplied)
To [AUDIO
IN]
S/AV/Editing
cable (not
supplied)
To [S/AV]
Digital HD Video
Camera (JY-HD10)
TV (HD Ready)
To front
input
connectors
Aerial or cable
NOTES:
●
To operate the VCR with your TV using the component or S-video connection, set your TV to the AV mode using the
TV's Remote.
You can also use the [TV/VCR] button on the VCR’s Remote to set your TV to the AV mode (
੬
page 45).
●
If you cannot see the pictures on the TV screen when you play back a tape, set “TV OUTPUT 1” to the appropriate
mode (
੬
page 38).
INSTALLING YOUR NEW VCR (cont.)