


57
Chapter 6:Specifying and Using Disc or Track Data
Chapter 1
Chapter 2
Chapter 3
Chapter 4
Chapter 5
Chapter 6
Chapter 7
Chapter 8
6-2-3 To clear the music type
(MUSIC TYPE CLEAR mode)
The following procedure clears the registration of one
disc in the music type.
Operation procedure
1. Check that the unit is in the normal play TRACK
mode. ¤
÷ Make sure that the disc door is closed.
2. Press the MODE button.
÷ When the MODE button is pressed during MUSIC
TYPE CLEAR mode, the MUSIC TYPE CLEAR mode
is cancelled.
3. Press the DISC + (up), – (down) button to select
“MUSIC TYPE”, then press the SET button.
4. Press the DISC + (up), – (down) button to select
“M.TYPE CLEAR”, then press the SET button.
5. Press the DISC + (up)/– (down) button to select the
music type to be cleared, and press the SET button.
6. Press the DISC + (up)/– (down) button to select the
disc to be cleared, and press the SET button.
÷ Repeat step 6 as required.
÷ When the registration of all "music type genres" is
deleted, "NO ENTRY" will be displayed.
7. Press the MODE button to complete this operation.
6-3 Reorganizing discs to desired
groups (USER FILE mode)
Eight user files are available for registering desired discs.
This makes the user possible to create files registering
the discs of a favorite artist(s) or the user's favorite discs.
The user files can be named as desired.
USER FILE 1, USER FILE 2, USER FILE 3, USER FILE
4, USER FILE 5, USER FILE 6, USER FILE 7, USER
FILE 8
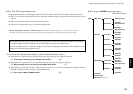
6-3-1 Registration of user file
(USER FILE SET mode)
Operation procedure
1. Check that the unit is in the normal play TRACK
mode. ¤
÷ Make sure that the disc door is closed.
2. Press the MODE button.
÷ When the MODE button is pressed during USER
FILE SET mode, the USER FILE SET mode is
cancelled.
3. Press the DISC + (up), – (down) button to select
“USER FILE”, then press the SET button.
4. Press the DISC + (up), – (down) button to select
“U.FILE SET”, then press the SET button.
5. Press the DISC + (up)/– (down) button to select a
user file number (1 to 8) and press the SET button.
÷ If user file names have already been registered, their
names are displayed in place of the above.
“Assigning user file names” O
6. Press the DISC + (up)/– (down) button to select the
disc to be registered in the “user file” selected in step
5, and press the SET button.
÷ The disc number can also be selected using the
numeric buttons. º
÷ The discs in the PLUS1 to PLUS3 slots cannot be
selected.
÷ Repeat step 6. if it is required to register another
disc in the user file selected above.
÷ The same disc can be registered in more than one
user files.
7. Press the MODE button to complete this operation.
÷ To register another user file, exit the USER FILE SET
mode once and restart from the beginning.
The registration can be cleared as follows.
To clear a disc from registration in a user file:
Play the disc to be registered and press the CLEAR
button during playback.
To clear all discs registered in a “User File”: I
When a “User File” is initialized : I
The file names registered when the “User File
Name” is registered are also cleared.