


39MD 80137 Digital DVD Recorder
and Player User’s Manual
Stop an In-Process Scheduled Recording
While the record is proceeding, press STOP to stop recording and go to DVD mode, or
press POWER to stop recording and go to stand-by status.
Recording Quality
You can record discs using five different quality levels. The higher the quality level, the
more space (time) will be taken up on your disc. Press REC QUALITY on your remote to
change the quality settings.
HQ (High Quality): The best picture quality 60 min. / 1 hour
SP (Standard Play): Excellent (DVD video) picture quality 120 min. / 2 hours
LP (Long Play): Good (S-VHS) picture quality 180 min. / 3 hours
EP: (Extended Play): Better than VHS quality 240 min. / 4 hours
SLP: (Super Long Play): VHS picture quality 360 min. / 6 hours
Recording times are estimates, actual recording times may vary. Please note that if your
source video is of low quality, then your final recording will be of low quality even if
you select a higher quality recording level. Recording over previously recorded discs may
also decrease the quality level.
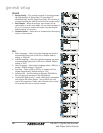
Correct a Scheduled Recording
1. Press SETUP on your remote control to enter the setup menu. Use the buttons to
select the “Record” menu, then press the button to enter the menu, next use
the buttons to select “Schedule Record”, finally press the button to enter
the menu.
2. Use the buttons to move the cursor to the number of the recording that you
would like to correct. Next press the button to make corrections.
3. Use the buttons to move the cursor to the information that you would like to
correct, then, use either the buttons or #’s 0-9 on the remote to enter the
correct value.
4. Confirm your settings: Use the buttons to move the cursor to the green arrow to
confirm and save settings or the red X to cancel settings. Press ENTER to confirm.
Cancel a Scheduled Recording
1. Press SETUP on your remote control to enter the setup menu. Use the buttons to
select the “Record” menu, then press the button to enter the menu, next use
the buttons to select “Schedule Record”, finally press the button to enter
the menu.
2. Use the buttons to move the cursor to the number of the recording that you
would like to cancel.
3. Press CLEAR on your remote control.
4. Confirm that you would like to cancel this recording by using the buttons to
select the green arrow to perform the operation or the red X to cancel.
scheduled disc recording