


76 Appendices
Appendix E: Troubleshooting
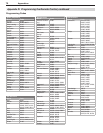
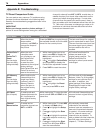
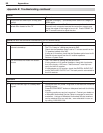
Reset Name When to Use How to Use Resulting Action
Format When the picture
shape seems
incorrect, use
FORMAT
to
change the shape of
the picture.
Press the
FORMAT
key to cycle through
the available formats to find the best
format for the current picture.
The last-used format for a signal
type is memorized for each input.
The next time the same input and
the same signal type is viewed,
the last-used format will be
recalled.
PerfectColor™
and
PerfecTint™
Reset
(for the single
input currently
being watched)
When the color
intensities seem
out of balance, use
the PerfectColor/
PerfecTint reset
to reset the color
balances to the original
factory settings.
Both PerfectColor and
PerfecTint and are
reset at the same time.
1. While viewing the input to be
reset, press
MENU
to display the
Main menu with the A/V icon
highlighted.
2. Use to highlight PerfectColor
and press
ENTER
to display the
PerfectColor adjustment screen.
3. Press
CANCEL
to reset the colors.
All PerfectColor/PerfecTint
sliders are reset to the
original center position. The
PefectColor/PerfecTint
settings for other inputs remain
unchanged.
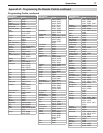
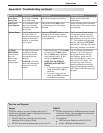
A/V Memory
Reset
(for the single
input currently
being watched)
When audio and/or
video settings for a
single input seem
incorrect, use A/V
Memory Reset to
return the input to
the original factory
settings.
1. While viewing the input to be
reset, press
MENU
to display the
Main menu with the A/V icon
highlighted.
2. Use to highlight the Reset
icon and press
ENTER
to reset.
All Video and all Audio (except
Balance, Listen To, & Language)
settings for an individual input
are reset. In addition, two
global settings (Video Noise &
SharpEdge) are reset to their
original factory settings.
A/V Reset
(for all inputs)
To reset audio and
video adjustments for
ALL inputs back to
their original factory
settings.
While viewing the TV, press the side
panel buttons
GUIDE
and
FORMAT
at the
same time.
All Audio and Video settings are
returned to their original factory
settings.
Channel
Memorization
To erase and re-
memorize channels on
ANT 1
or
ANT 2
.
1. While viewing the TV, press
MENU
to display the Main menu.
2. Press to highlight the Setup
icon.
3. Press to highlight the Scan
icon.
4. Press to highlight the antenna
input and reception mode, e.g.
ANT 1 Air.
5. Press to highlight the Start
button icon and press
ENTER
to
start the memorization.
All previously memorized
channels for the selected
antenna input are erased and a
new set of memorized channels
is created. All custom settings
for Fav, channel names, and
channel locks are deleted. To
add or delete individual channels,
see Edit menu instructions in
chapter 5, “TV Menu Settings.”
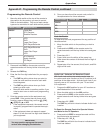
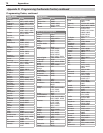
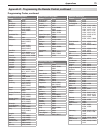
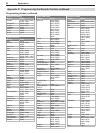
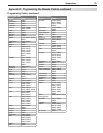
TV Reset Comparison Guide
You can resolve many common TV problems using
the reset functions described in the following table.
See also the troubleshooting suggestions later in this
appendix.
IMPORTANT
Before you change sound or picture settings: If
picture or sound settings seem wrong for a broadcast
channel (a channel from
ANT 1
,
ANT 2
, a cable box, or
satellite receiver), first check other channels from the
same input before changing settings. If most other
channels from the same input seem correct, there is
likely a problem with the broadcast rather than with the
TV. Use care in this case, as changes you make to fix
problems on individual channels also affect all other
channels on the same input.