


GB 8
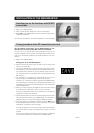
The box for your Mediamaster should contain the
following items:
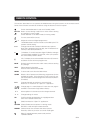
• the Mediamaster
• remote control with 2 AAA batteries
• SCART cable (fully connected 1,0 metre)
• aerial/RF cable (double screened 1,5 metres)
• owner’s manual and software license agreement
• mains cable
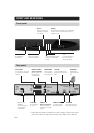
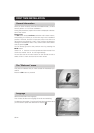
INSTALLATION OF THE MEDIAMASTER
SCART socket
SCART cable
Owner’s manual
License agreement
RF cable
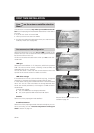
Preparing the remote control
• Remove the cover on the battery compartment at the bottom
of the remote control.
• Insert the 2 AAA (1,5 V) batteries, as shown in the diagram,
taking care to observe the + and - markings indicated inside.
• Replace the cover.
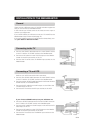
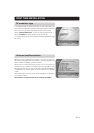
Installing the satellite dish
• See the ”Fitting instructions for satellite dish” on how to in-
stall the dish.
• Connect the coaxial cable, with F-connectors fitted, from the
LNB on the satellite dish to the socket marked ”ANTENNA”on
the rear panel of the Mediamaster.
Connecting the Mediamaster to the dish
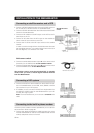
If you need to fit the F-connectors onto the cable
• Prepare each end of the cable as shown in the diagram. You
will need to fold back the outer braid (as shown).
• Slide the F-connector onto the cable, then turn it clockwise
until it grips the braid.
• Ensure that 3 mm of the core is protruding from the end of the
connector.
8 mm
15 mm
3 mm
F-connector
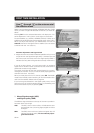
Remote
control
mains
cable
About the SCART sockets
The rear panel of the Mediamaster is equipped with 2 SCART
sockets (see diagram). When you connect other devices to any
of these sockets, always use fully connected SCART cables (as
the one supplied.) There are SCART cables available which do not
have all the pins connected. The picture quality could be reduced
if you use them.