


37
RQT5741
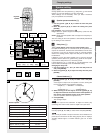
Home Theater
(PCM/BITSTREAM)
RL
OPTICAL COAXIAL
CENTER SURROUND R/
FRONT R
L/
FRONT L
R
L
SUB-
WOOFER
T
AC IN
DIGITAL AUDIO OUT
AUDIO OUT
5.1 ch 2 ch
AUDIO OUT
2 ch
P
B
YP
R
(PCM/BITSTREAM)
OPTICAL COAXIAL
CENTER SURROUND R/
FRONT R
L/
FRONT L
R
L
SUB-
WOOFER
S VIDEO OUT
AC IN
COMPONENT VIDEO OUT
VIDEO OUT
DIGITAL AUDIO OUT
AUDIO OUT
5.1 ch 2 ch
R
L
AUX IN
OPTICAL COAXIAL
or
480P COMPONENT VIDEO OUT
P
B
YP
R
»
C
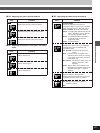
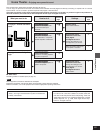
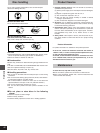
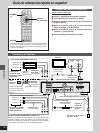
Connecting an analog amplifier or
system component
»
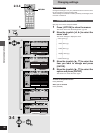
D
Connecting a digital amplifier or
system component
Recording to MDs or cassette tapes
º Digital recording
You can record the digital signal directly onto an MD.
The signals on DVDs will be converted to 48 kHz/16 bit linear PCM.
Ensure the following conditions are met.
³There is no copy guard recorded on the disc.
³The recording equipment can handle a sampling frequency of
48 kHz/16 bit.
To make a digital recording
1. Connect the recording equipment with an optical or coaxial digit-
al audio cable (➡ [D] above).
2. When recording DVDs, make the following settings.
ADVANCED SURROUND (V.S.S.): OFF (➡ page 23)
Digital Audio Output: On (RE-MASTER Off) (➡ page 31)
PCM Down Conversion: Yes (➡ page 34)
Dolby Digital/DTS Digital Surround: PCM (➡ page 34)
º Analog recording
You can record to an MD or cassette deck. Using analog connection
means sound will be unaffected by the copy guards found on DVDs.
To make an analog recording
Connect the recording equipment with an audio cable (➡ [C] above).
To enjoy Dolby Pro Logic
³If you connect an amplifier that can decode Dolby Pro Logic, you will also need to connect center and surround speakers to enjoy
surround sound. Read the instructions for the equipment for connection details.
³Turn Advanced Surround off (➡ page 23). Dolby Pro Logic will not function correctly if Advanced Surround is on.
Change “Digital output” (➡ page 34).
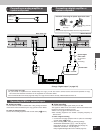
Amplifier or system component
Back of the unit
Back of the unit
Coaxial cable
Optical digital
audio cable
Do not bend
when
connecting.
Audio cable
White (L)
Red (R)
Note when connecting the optical digital audio cable
Note
Keep the dust cap and reattach when not using the terminal.
Remove the
dust cap
Align the plug with the
terminal