


Pelco Manual C673M (2/01) 69
TROUBLESHOOTING
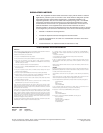
SELF-DIAGNOSTIC FUNCTION AND WARNING DISPLAY
The VCR uses self-diagnostics to detect internal malfunctions during recording. If one
occurs, the VCR indicates it on the fluorescent display and/or the monitor. Table J shows
the type of malfunction corresponding to the warning display and the action to take.
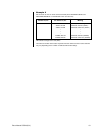
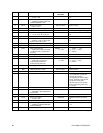
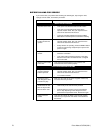
Table J. Warning Display and Actions
Fluorescent Monitor Cause Remedy To Turn Off
Display Indicator
End TAPE END Tape ends Rewind tape or Rewind tape or
during recording. press EJECT. press EJECT.
noSIg NO SIGNAL No video signal Check for loose Restore video
input during connections. signal or clear
recording. recording mode.
(display CHECK Tape or deck Check cassette. If nothing is wrong,
starts trouble during try recording again. If “CHECK” still
flashing) recording. appears, insert a new cassette and
retry recording. If “CHECK” stays on,
unplug the power cord and contact
the dealer.
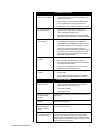
CLog --- Clogged head Eject and Clear the
during recording reinsert the recording mode.
at 120H-224H cassette. Wait
or 0H (except more than 5
for 128H) mode. seconds. Repeat
4 or 5 times. Try
recording again.
If “CLog” remains,
consult your
dealer.
• When the tape ends:
When the tape reaches its end during recording, “End” appears on the fluorescent
display and “TAPE END” appears on the monitor. They will not appear if TAPE END in
the First Time Set Up menu is set to REPEAT, ALARM•PROT (when no alarm
recording is made), or REWIND.
• Lack of video signal:
“NO SIGNAL” appears on the monitor and “noSIg” flashes on the fluorescent display
when the VCR cannot get any video signal during recording. Check that the cable
from the camera is not broken and the camera has power.
• Clogged head:
When CLOG DETECT in the Recording Set Up menu is set to ON, the VCR automati-
cally removes particles that have accumulated on the heads during recording at 120H-
224H or 0H modes (except for 128H mode). If they cannot be removed entirely, “CLog”
flashes on the fluorescent display. If this happens, follow the remedy in Table J.