


12 C2639M-B (8/09)
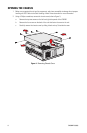
INSTALLING A DRIVE
1. Place the drive in the basket:
a. Position the drive in the basket.
b. Using a Phillips screwdriver, reinstall the screws to secure the drive to the basket.
c. Repeat steps 1a and 1b for each HDD.
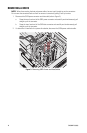
2. Reinstall the basket:
a. Carefully and gently lower the basket into place.
b. Using a Phillips screwdriver, fasten the four screws that secure the drive basket to the
chassis.
c. Repeat steps 2a and 2b for each basket.
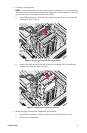
3. Reconnect the cables:
a. Carefully reconnect the SATA data connector.
b. Carefully reconnect SATA power connect.
c. Repeat steps 3a and 3b to reconnect the cables for each HDD.
4. Set up the hard drive:
• System drive: Refer to Setting Up the System Drive on page 13.
• Data drive: Refer to Setting Up a Video Data Drive on page 21.
NOTE: Do not reinstall the cover at this time. You may need to access an HDD before you complete all
drive partition formatting procedures.