


6 C2639M-B (8/09)
Description
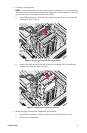
This manual describes how to replace, upgrade, or install a new hard disk drive (HDD) in the
DX8100 Series hybrid/digital video recorder (HVR/DVR). Before you install the hard drive, familiarize
yourself with the instructions in this manual.
NOTES:
• This document describes how to install a new unformatted HDD. Using this procedure for other
scenarios might result in data loss.
• Installing an internal HDD storage device other than a device obtained from Pelco will immediately
void the warranty on the DX8100 HVR/DVR.
The DX8100 allows you to install one system drive (required) and up to three data HDDs. The system drive
installation process allocates 15 GB for installing the system software. System software includes the
Windows operating system and the DX8100 Series application software. The remaining storage capacity
on the system drive can be configured to store video data. The DX8100 supports up to three data drives for
storing video data.
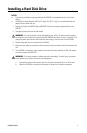
PARTS LIST AND TOOLS
To install the HDD, you will also need a nonmagnetic Phillips screwdriver #1, a properly grounded ESD
wrist strap and mat, and four small containers (optional) to store screws.
Qty Description
1 CD-DX81PD disc for partitioning the system HDD
1 DX8100 Recovery disc for installing the operating system software on the system HDD
1 SATA disk
1 SATA data cable for connecting SATA drive to the unit’s motherboard
1 Grounding wrist strap for protecting the unit and its hard drive components against ESD
2 Screws for securing the drive to the mounting basket
1 HDD installation manual