Turning on your DVD/VCR
The following steps only be performed when you insert the AC
PLUG at the first time.
1 Turn on the TV and select the
video channel on the TV.
2
Plug in the DVD/VCR.
3 Confirm with P+.
The automatic TV channel search
starts.
4 “TIME” and “DATE” will appear on
the TV screen.
5 Check “TIME”. If required, please
change the time with numerical key
pads.
6 Check if the displayed settings for
“DAY”,“MONTH” and “YEAR” are
correct.
7 When all information is correct,
save by pressing STATUS/EXIT.The
preparation for use is now com-
plete.
Note:
– If the DVD/VCR has been completed AUTO TUNING at
this procedure,this initial menu has never shown even if
power failure is occured or inserted AC plug again.)
7
Setting Up your DVD/VCR
PLEASE WAIT
START FINISH
❚❚❚❚❚❚❚❚❚❚❚
❚❚❚❚❚❚❚❚❚❚❚❚❚
PLEASE CONNECT AERIAL OR
CABLE TO THE VCR
THEN...
PUSH P
+ KEY
OR...
FOR PLAY ONLY - PUSH PLAY
TIME --:--
DATE --/--/--
SMART CLOCK [ON]
END=EXIT
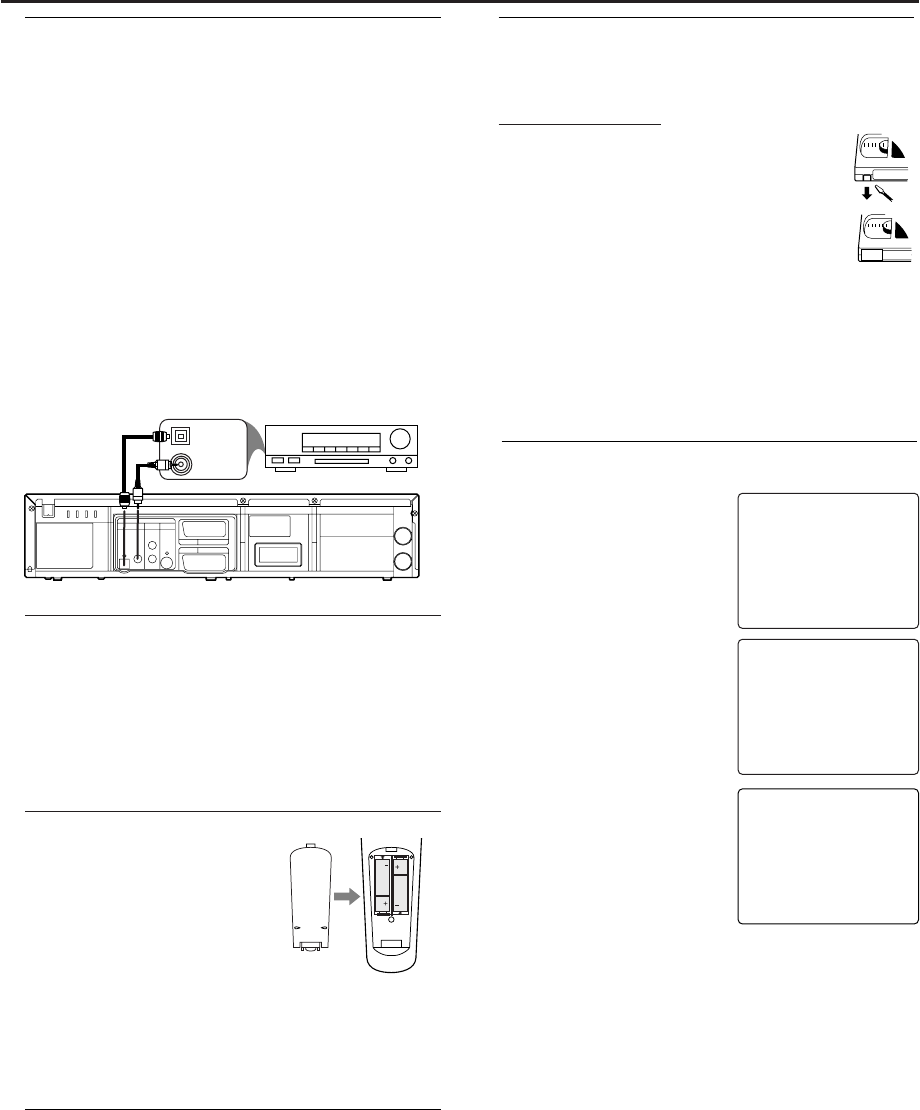
Connecting to Optional Equipment
(for DVD features)
• A digital component with a built-in MPEG 2 or Dolby
Digital
TM
decoder allows you to enjoy the surround sound
while producing the effect of being in a movie theater or a
concert hall.
• The player outputs the surround sound signals from the DIG-
ITAL OUT COAXIAL or OPTICAL connector.
If your receiver has a MPEG 2 or Dolby Digital™ decoder,
1 Connect the COAXIAL or OPTICAL DIGITAL AUDIO OUT
of the DVD/ VCR to the COAXIAL or OPTICAL DIGITAL
AUDIO IN on your receiver.
Notes:
– If the audio format of the digital output does not match
the capabilities of your receiver, the receiver will pro-
duce a strong,distorted sound or no sound at all.
– MP3 Audio is not available on the Digital Output.
– You will still need the video cable or RF coaxial cable for
VCR features.
RF OUT
AERIAL
DVD
DVD/VCR
AV1(TV)
VCR
AV2(DECODER)
ANALOG
AUDIOOUT
DIGITAL
AUDIO OUT
S-VIDEO
OUT
COAXIAL
L
R
OPTICAL
COAXIAL DIGITAL
AUDIO IN
OPTICAL DIGITAL
AUDIO IN
AUDIO RECEIVER
Using the Remote Control
• Direct the remote control at the remote sensor of the DVD/
VCR.
• Do not drop the remote control.
• Do not leave the remote control near extremely hot or
humid place.
• Do not spill water or put anything wet on the remote con-
trol.
Inserting batteries into the Remote Control
1 Open the battery cover.
2 Insert batteries (AA size) with the
correct polarity as indicated by the
+ and - symbols inside the battery
compartment.
3 Close the cover.
CAUTION!
– Remove batteries if they are exhausted or not to be used
for a long time.
– Do not use old and new or different types of batteries in
combination.
– Batteries contain chemical substances, so they should be
disposed off properly and kept away from children.
External Input Mode (for VCR features)
To r eceive the signal from an external input (decoder, satellite
receiver,video camera,another VCR etc.), connect to the AV2
(DECODER) socket,and enter “002” with numerical key pads
to appear “AV2” on the TV screen.
If you use the AV1 (TV) socket,enter “001” with numerical key
pads to appear “AV1” on the TV screen.
If you use the front AUDIO/VIDEO input jacks,enter “003” with
numerical key pads to appear “AV3” on the TV screen.
Playable Video Cassette Tapes
Philips Consume Electronics recommends that only video cas-
sette tapes that have the VHS mark and High Quality (HQ) sys-
tem is compatible with this DVD/ VCR.This
DVD/ VCR has an Automatic Head Cleaner.
Recording Prevention
Video cassette tapes have record tabs to
ensure recordings are not erased accidentally.
1 To prevent recording,break off the tab with a
screw-driver.
2 To allow recording,cover the hole with cello-
phane tape.
Notes:
– Use only tapes with VHS mark.
– Remove any adhesive stick-on notes from the tape
before inserting into the DVD/ VCR.
– Periodic maintenance is required to maintain your DVD/
VCR performance.
– Video heads will require replacement after a period of
time. Only an authorised service center should perform
this service.
1
2


