


16
PHILIPS LTC3963/51 (E) QR31809
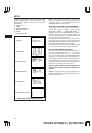
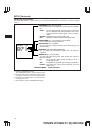
1. Press the START/STOP button.
The program number (1) flashes on/off.
2. Press the SET button. The start hours flash on/
off.
3. Press the UP or DOWN button until the desired
number appears on the monitor.
4. Press the SET button. The start minutes flash
on/off.
5. Press the UP or DOWN button until the desired
number appears on the monitor.
6. Press the SET button. The stop hours flash on/
off.
7. Repeat steps 3 through 5 to set the stop hours
and minutes.
8. Press the SET button. The timer recording
speed flashes on/off.
9. Press the UP or DOWN button until the desired
number appears on the monitor.
10. Press the SET button after setting the timer
recording speed. The program number of the
next lower line flashes on/off.
11. Repeat steps 2 through 9 to set the program to
the other program numbers.
12. Press the SET button after setting the program
numbers (1) through (7).
The two program event locations of MON flash
on/off.
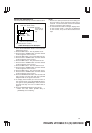
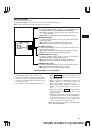
13. Press the SET button. The first program event
location of MON flashes.
14. Press the UP or DOWN button until the desired
program number appears on the monitor.
15. Press the SET button. The other program event
location of MON flashes on/off.
16. Press the UP or DOWN button until the desired
program number appears on the monitor.
Notes:
• If you do not need to timer record two events
a day, mark either event with an asterisk (✽).
• If two asterisks are displayed, no timer record-
ing is made on that day.
17. After setting two program event locations of
MON, press the SET button. The two program
event locations of the next day of the week
flashes on/off.
18. Press the SET button. The first program event
location of the next day flashes.
19. Repeat steps 12 through 16 to set the program
event locations up to SUN.
20. Press the START/STOP button when the TIMER
has been set.
Notes:
1. Programming the TIMER function does not acti-
vate it. See TIMER recording, page 21.
2. To record the time and date press the PROGRAM
button to display them.
3. When the preset START time is later than the
STOP time, the recording will be made into the
following day.
4. When the START time and STOP time are the
same, a recording will not be made.
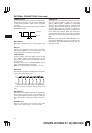
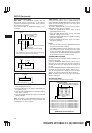
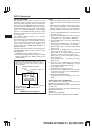
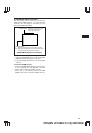
5. When the programs for timer recording overlap
each other, recording will be switched to the pro-
gram with the later recording start time.
6. When two programs have the same start time,
the program number with the earlier stop time
has priority.
■ To correct information
1. Press the START/STOP button.
2. Press the UP or DOWN button repeatedly until
the item to be corrected (Program number or
program event location of day of the week)
flashes on/off.
3. When the section to be corrected flashes on/off,
press the SET button.
• Press the SET button again so that only the
digit to be corrected flashes on/off.
4. Press the UP or DOWN button to correct the set
information.
5. After completing the correction, press the
START/STOP button.
Example
•••••
Record
Time
Program number 1
Program number 2
Program number 3
When recording of program
number 3 is terminated, program
number 2 will be recorded for its
remaining time.