


- 12 - EN
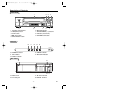
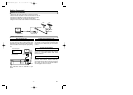
18. Press number buttons to enter PROG..
• If you connected the VCR to a cable box or
satellite box, select the VCR to the video
channel.
Then, select the channel you want to record at
the cable box or satellite box. Leave the cable
box or satellite box on for recording.
19. Press number button to select recording
speed SP(1) or LP(2).
10. Press number buttons to enter recording
date.
11. Press [STATUS/EXIT].
• If “NOT COMPLETED” appears, repeat from
step [1] again.
12. Press [STANDBY] to set the timer. The
TIMER indicator on the VCR comes on.
• If there is a power failure or the VCR is
unplugged for more than one minute, the
clock setting and all timer settings will be
lost.
• If the tape runs out before the end time, the
VCR will switch to the Stop mode immediate-
ly, eject the tape and the VCR power will be
turned off. The TIMER indicator will flash.
• If a tape is not in the VCR or does not have
the erase-protection tab, the TIMER indicator
flashes and timer recording cannot be per-
formed. Please insert a recordable tape.
• The VCR must be turned off to set the timer.
If you forget to turn off the VCR, “TURN OFF
VCR FOR TIMER RECORDING” flashes on
your TV screen two minutes before a timer
recording starts. Press [CLEAR] to remove
the message.
• “CLASH” may flash on the screen when you
finish setting a timer recording, then the
“TIMER” menu will appear. This means that
the timer recording you just programmed and
another timer recording overlap, and thus the
current timer recording will not be carried
out.
T
o Correct an Automatic Timer Programme
1. Press [STANDBY] so that the “ON” indicator
appears on the display.
2. Repeat steps [1] to [5] in “Timer Recording”.
3. Go to the digit you want to change by using
[CLEAR].
4. Enter correct numbers using the number but-
tons.
5. Press [STATUS/EXIT] to exit.
6. Press [STANDBY] to return to timer stand-by
mode.
T
o Stop a Started Automatic Timer Programme
Press [STOP/L] on the VCR.
T
o Cancel or Check The Start/End Time
1. Press [STANDBY] so that the “ON” indicator
appears on the display.
2. Press [MENU].
3. Press [PLAY/K] or [STOP/L] to select
“TIMER”, then press [F.FWD/B].
4. Press [PLAY/K] or [STOP/L] to select “TIMER
REVIEW”, then press [F.FWD/B]. The timer
recording information for the programme in
the lowest numbered slot will appear on-
screen. If no timer recordings are set, nothing
will happen when you press [F.FWD/B]. You
may cancel the entire programme by pressing
[CLEAR].
5. Press [F.FWD/B] repeatedly to review all pro-
grammed timer recordings. If you do not press
[F.FWD/B] within 10 seconds, the VCR will
automatically display information about the
next programmed timer recording. This will
continue until all timer recordings have been
displayed. Then the menu will disappear.
6. Press [STATUS/EXIT] to exit.
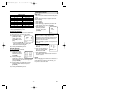
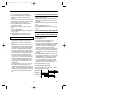
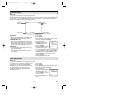
Avoid overlap of programmes ...
The timer programme does not work if another
timer programme is in progress.
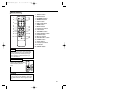
Hint for Timer Recording
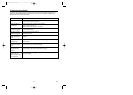
Programme 1
Programme 2
Programme 3
9:00AM 10:00AM 11:00AM
V(
10:00AM–11:30AM
)
[(
9:30AM–11:00AM
)
V(
9:00AM–10:00AM
)
H87T4(EN)BACK.QX33 01.7.3 6:44 PM Page 12