


Important for the United Kingdom
This machine is fitted with an approved moulded 13 Amp plug.
To change a fuse in this type of plug, please follow these
instructions.
a Take off the fuse cover and take out the fuse.
b Put in a new fuse which should be a BS1362 3A, A.S.T.A.
or BSI approved type.
c Refit the fuse cover.
If the plug fitted is not suitable for your socket, cut it off and fit
another type.
If the plug you fit contains a fuse, it should be a 3Amp fuse. If
you fit a plug which does not need a fuse, make sure the fuse
on your fuse box is not greater than 5 Amps.
DNote: Please destroy the plug you have cut off so
that it cannot be used in a 13 Amp socket
somewhere else.
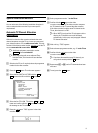
How to connect a plug
The wires in the lead from the video recorder are coloured as
follows.
* Blue - ’neutral’ (’N’).
* Brown - ’live’ (’L’).
d Connect the blue wire to the terminal in the plug which is
marked with the letter ’N’ or coloured black.
e Connect the brown wire to the terminal in the plug which
is marked with the letter ’L’ or coloured red.
f Do not connect either of the wires to the terminal in the
plug which is marked with the letter ’E’, the symbol \or
coloured green or green and yellow.
Before you refit the plug cover, make sure that the grip at the
bottom of the plug is clamped over the plastic cover of the
lead, not just over the two wires.
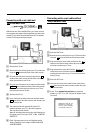
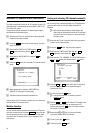
How to connect your video recorder to the
TV set
We recommend the use of a scart cable. This will give you the
best picture and sound quality.
When you install your video recorder for the first time, please
read:
E The section ’Connecting with scart cable and Easy
Link/NexTView’, when your TV set is equipped with ’Easy
Link/NexTView’.
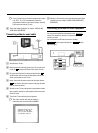
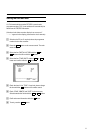
E The section ’Connecting with scart cable without Easy
Link/NexTView’, when your TV set is not equipped with
’Easy Link/NexTView’.
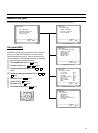
E The section ’Connecting without a scart cable’, if you are
not using a scart cable.
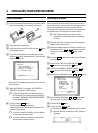
1. HOW TO CONNECT YOUR VIDEO RECORDER
4