


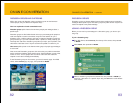


UPDATES - GETTING THE LATEST FEATURES
WebTV Networks is always working to improve the WebTV service. From time
to time, feature updates will be offered to you at no cost when you connect to the
WebTV service.
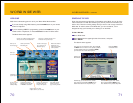
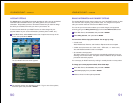
To get the latest WebTV service features, select
Update Now when you see one of
these notices, then press
OK or RETURN.
You may be offered an update the first time you turn on your receiver. Just select
Update Now and press OK or RETURN and you’ll be on your way. (The update
process takes about 20-30 minutes.)
As your WebTV service continues to be upgraded, you may
eventually see screens that have changed or have access to features that are not
documented in this guide. While future improvements may render sections of this
guide out-of-date, you can always get the latest instructions from the on-screen
help. For information on using any part of the WebTV service, just select Help
from Web Home or TV Home, then press
OK
or
RETURN
.
NOTE
93
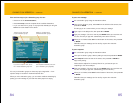
ADDING USERS TO YOUR ACCOUNT
You can have up to six users on your account at no extra charge. This includes
the user who signed up for service initially—known as the primary user—plus five
additional, “secondary” users.
Each secondary user can have his or her own e-mail address, password, a
separate list of Favorites, a separate name to use in Chat rooms, and other
personal settings.
The primary user can set up a secondary user for a child to use,
with built-in protections from inappropriate material on the Web.
Follow these steps to add a new user to your account:
1 From Web Home, select Switch User from the row of options near the top of the
screen, then press
OK or RETURN.
If this is the first time you have selected
Switch User, you will see a page telling
you about adding users to your account. Select
Add Users Now, then press OK
or RETURN.
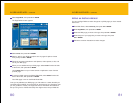
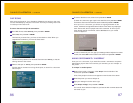
2 From the WebTV Users screen, select Add User from the bottom of the screen,
then press
OK or RETURN.
3 Type the person’s first and last name, select Continue, then press OK or RETURN.
4 Follow the on-screen instructions to choose an Internet name, and set up the
account (including the child-protection settings, if desired) for this new user.
TIP
92
YOUR ACCOUNT –
continued
YOUR ACCOUNT –
continued