


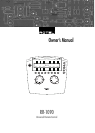

8 RR-1090
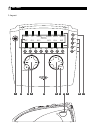
Device Buttons
Eight round buttons on the RR-1090 select which
command set is active and which component will
be controlled. For example, press the AV1 button
and the RR-1090 becomes the remote control for your
Rotel Surround Sound Processor. Press the TV but-
ton and the RR-1090 becomes the remote control
for your TV set.
To operate the RR-1090, first press the DEVICE key
for the desired component. Then, press basic or menu
COMMAND buttons to send the infrared commands
for that component.
NOTE
: The AV1, AV2, and AV3 DEVICE keys can be
used for any type of component.
Basic Command Buttons
The POWER button on the right side of the remote
plus two large round 4-way buttons and two smaller
round buttons in the center of the RR-1090 duplicate
the primary functions for your components – power,
volume, channel up/down, play, fast forward, pause,
etc. The commands for each button vary, depend-
ing on the selected DEVICE button.
Menu Command Keys
and LCD Display
At the top of the RR-1090 is a group of 12 rectan-
gular buttons surrounding an LCD display. These
MENU COMMAND keys provide additional func-
tions shown by menu labels appearing in the dis-
play adjacent to each button.
The function of these buttons varies depending on
the type of component selected by the DEVICE but-
tons and the menu page displayed.
PAGE Button
Each component selected by a DEVICE button can
have up to 48 menu commands. These commands
appear in the LCD display in groups (or pages) of
twelve. Press the PAGE button to advance to the next
page of commands, with new labels appearing in
the LCD display. Each press of the PAGE button jumps
to the next group for that component, eventually cy-
cling back to the original page.
MACRO Buttons
Four buttons labeled M1, M2, M3, and M4 provide
a special macro function – sending a sequence of
up to 10 commands. For example, a macro sequence
could turn on the TV set, select channel 5, turn on
the surround processor, and select the TV input.
Two of the MACRO buttons (M3 and M4) are also
used in customizing the RR-1090.
Menu Button
This button activates and selects between a series
of menu screens in the LCD display used for custom-
izing the RR-1090. The MENU button is not used
during normal operation.
Power Button
In addition to serving as a basic command button,
the POWER button is also used during the SETUP
procedure when searching the database of IR com-
mand codes.
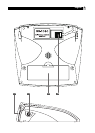
Serial Connector
This 4-pin modular connector on the back of the
RR-1090 can be used to connect the remote to a
standard DB-9 serial connector on a PC using the
supplied cable.
Using PC-LINK software supplied with the unit, codes
and commands can be uploaded and/or down-
loaded from a Windows
®
95/98 computer to the
RR-1090 remote. This allows easy transfer of one
remote’s programming to other RR-1090 remotes as
well as simplified customization. See the section on
PC-LINK software in this manual.