


English - 22
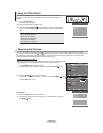
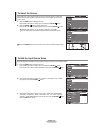
Setting the Digital Noise Reduction
If the broadcast signal received by your TV is weak, you can activate the Digital Noise
Reduction feature to help reduce any static and ghosting that may appear on the screen.
1. Follow the “Activating Picture Options” instructions numbers 1 and 2.
(Refer to page 20)
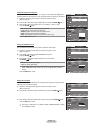
2. Press
the Ÿ or ź button to select "Digital NR", then press the ENTER
button.
3.
Press the Ÿ or ź button to select "Off", "Low", "Medium", "High" or "Auto".
Press the ENTER
button.
Off: Turns the screen noise reduction function off.
Low: Reduces screen noise at a low level.
Medium: Reduces screen noise at a medium level.
High: Reduces screen noise at a high level.
Auto: Automatically recognizes and reduces screen noise.
Press the EXIT button to exit.
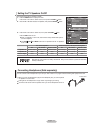
Move Enter Return
Color Tone : Normal Ź
Size : Wide Ź
Digital NR : Auto Ź
HDMI Black Level : Normal Ź
Film Mode : Off Ź
Picture OptionsTV
Move Enter Return
Color Tone : Normal
Size : Wide
Digital NR : Auto
HDMI Black Level : Normal
Film Mode :
Off
Picture OptionsTV
Off
Low
Medium
High
Auto
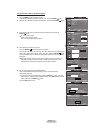
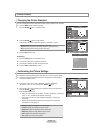
Setting the HDMI Black Level
You can select the black level on the screen to adjust the screen depth.
1. Follow the “Activating Picture Options” instructions numbers 1 and 2.
(Refer to page 20)
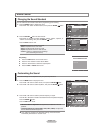
2. Press the
Ÿ or ź
button to select “HDMI Black Level”, then
press the ENTER
button.
3. Press the
Ÿ or ź
button to select “Normal” or “Low”, then press
the ENTER
button.
• Normal: The screen gets brighter.
• Low: The screen gets darker.
This function is active only when an external device is connected to the TV via
HDMI. “HDMI Black Level” function may not be compatible with all external
devices.
Press the EXIT button to exit.
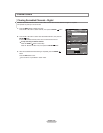
°
Picture Options
Color Tone : Normal Ź
Size : Wide Ź
Digital NR : Auto Ź
HDMI Black Level : Low Ź
Film Mode : Off Ź
TV
Move Enter Return
Picture Options
Color Tone : Normal
Size : Wide
Digital NR : Auto
HDMI Black Level : Normal
Film Mode : Off
TV
Move Enter Return
Normal
Low
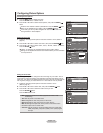
Setting the Film Mode
The TV can be set to automatically sense and process ¿lm signals from all sources and
adjust the picture for optimum quality.
1. Follow the “Activating Picture Options” instructions numbers 1 and 2.
(Refer to page 20)
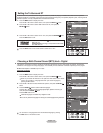
2. Press the Ÿ or ź button to select "Film Mode", then press the ENTER
button.
3. Press the Ÿ or ź button to select "Off" or "Auto", then press the ENTER
button.
Press the E
XIT button to exit.
" Film mode" is supported in TV, VIDEO, S-VIDEO, COMPONENT(480i / 1080i)
and HDMI(480i / 1080i).
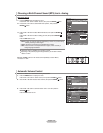
Picture Options
Color Tone : Normal Ź
Size : Wide Ź
Digital NR : Auto Ź
HDMI Black Level : Normal Ź
Film Mode : Off Ź
TV
Move Enter Return
Picture Options
Color Tone : Normal
Size : Wide
Digital NR : Auto
HDMI Black Level : Normal
Film Mode : Off
TV
Move Enter Return
Off
Auto