English - 14
Connecting a VCR
Video Connection
These instructions assume that you have already connected your TV to an antenna or a cable TV system (according
to the instructions on pages 10~11). Skip step 1 if you have not yet connected to an antenna or a cable system.
➢
If you have a “mono” (non-stereo) VCR, use a Y-connector (not supplied) to hook
up to the right and left audio input jacks of the TV.
If your VCR is stereo, you must connect two cables.
➢
Each VCR has a different back panel configuration.
➢
When connecting a VCR, match the color of the connection terminal to the cable.
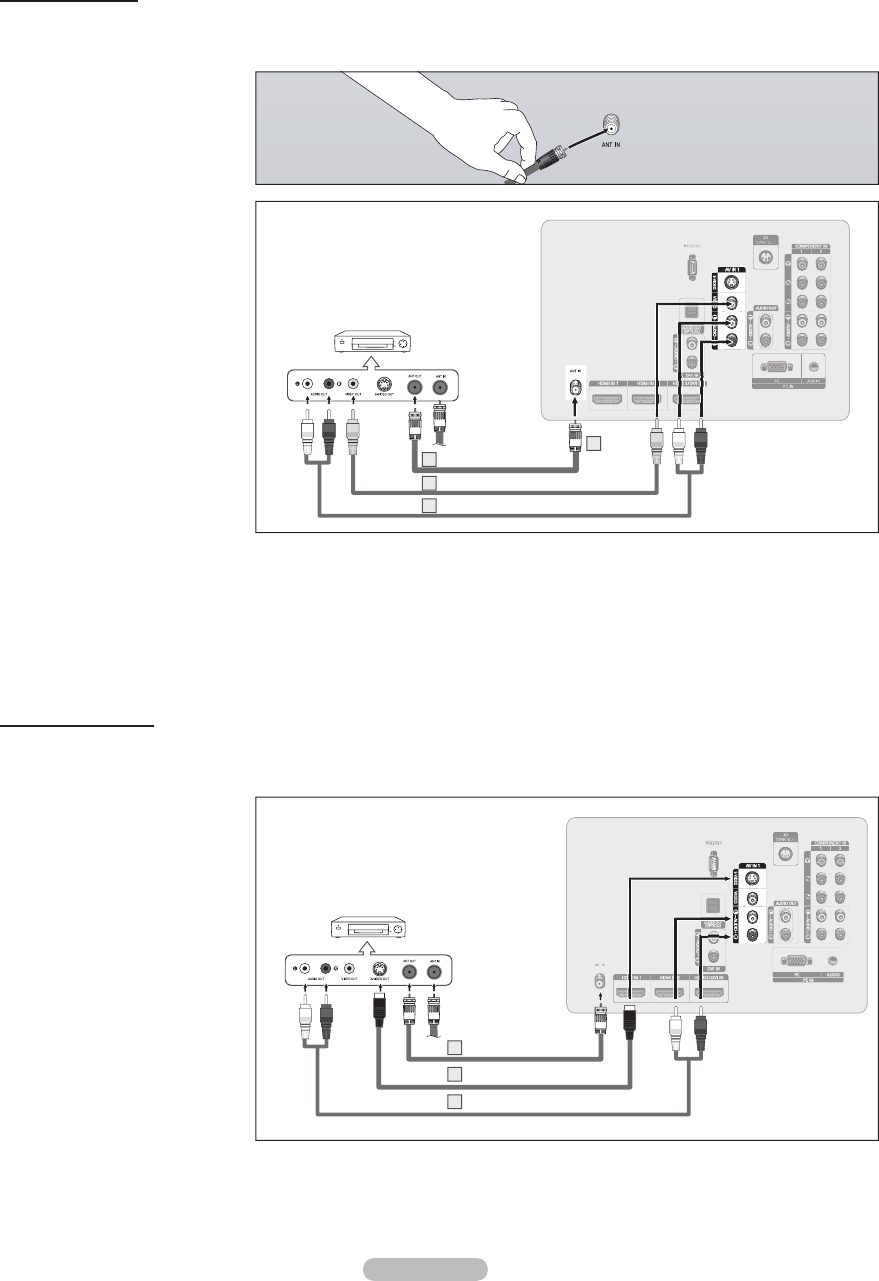
VCR Rear Panel
TV Rear Panel
2
Audio Cable(Not supplied)5
Video Cable(Not supplied)4
Antenna cable(Not supplied)3
S-Video Connection
Your Samsung TV can be connected to an S-Video jack on a VCR.
(This connection delivers a better picture as compared to a standard VCR.)
1 To begin, follow steps 1–3
in the previous section to
connect the antenna or cable
to your VCR and your TV.
2 Connect an S-Video Cable
between the S-VIDEO OUT
jack on the VCR and the AV
IN 1 [S-VIDEO] jack on the
TV.
3 Connect Audio Cables
between the AUDIO OUT
jacks on the VCR and the AV
IN 1 or 2 [R-AUDIO-L] jacks
on the TV.
An S-Video may be included with your VCR. (If not, check your local electronics store.)
➢
Each VCR has a different back panel configuration.
➢
When connecting a VCR, match the color of the connection terminal to the cable.
VCR Rear Panel
TV Rear Panel
Audio Cable (Not supplied)
3
S-Video Cable(Not supplied)2
Antenna cable(Not supplied)1
1 Unplug the cable or antenna
from the back of the TV.
2 Connect the cable or antenna
to the ANT IN terminal on the
back of the VCR.
3 Connect an Antenna Cable
between the ANT OUT
terminal on the VCR and the
ANT IN terminal on the TV.
4 Connect a Video Cable
between the VIDEO OUT
jack on the VCR and the AV
IN (1 or 2) [VIDEO] jack on
the TV.
5 Connect Audio Cables
between the AUDIO OUT
jacks on the VCR and the AV
IN (1 or 2) [VIDEO] jacks on
the TV.
BP68-00670A-01Eng.indb 14 2008-04-24 오후 3:04:14


