


English - 36
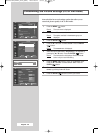
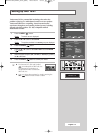
Selecting the Picture Size
You can select the picture size which best corresponds to your
viewing requirements.
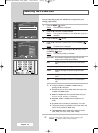
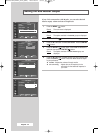
1 Press the MENU ()button.
Result
: The main menu is displayed.
2 Press the ▲ or ▼ button to select Picture.
Result
:
The options available in the
Picture
group are
displayed.
3 Press the ENTER () button.
4 Press the ▲ or ▼ button to select Size. Press the ENTER ()
button.
Result
:
The
Size
menu is displayed.
5 Select the required mode by pressing the ▲ or ▼ button. Press
the
ENTER () button.
Result
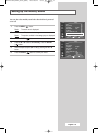
: The following modes are available:
Auto Wide Automatically enlarges the image to fit into 16:9
aspect ratio providing optimal display.
Wide Adjusts the picture to fit into the 16:9 wide aspect
ratio.
Panorama Adjusts a wide picture to appear natural.
Zoom1
Vertically enlarges the picture by approximately
130%.
Zoom2
Vertically enlarges the picture by approximately
150%.
4:3 Adjusts the picture to fit into a 4:3 normal aspect
ratio.
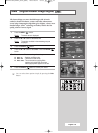
➢
◆ Lifting is available in the Zoom1 or Zoom2 mode by
pressing the
▲ or ▼ button.
◆ Subtitles may be cut-off or hidden below the screen area
in
Zoom1 and Zoom2 modes.
◆ Zoom1 and Zoom2 mode is only enabled when the input
s
ource is TV, AV, S-Video
,
or Component.
◆ Panorama, Zoom1, or Zoom2 mode is disabled
in DVI
m
ode.
◆ Only Wide and 4:3 modes are selectable
in PC m
ode.
◆ The screen size can be adjusted in each input mode, and
the PIP is only enabled in
Wide mode.
◆ The Panorama mode is disabled in component modes
(480i, 480p, 576i, 576p, 720p, 1080i, 1080p).
➢
You can select these options by simply pressing the
P.SIZE () button on the remote control.
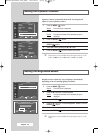
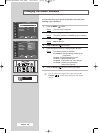
Picture
Move Enter Return
▲ More
Brightness Sensor :Off
√√
Size :Auto Wide
√√
TV
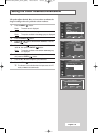
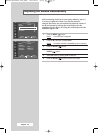
Picture
Move Enter Return
▲ More
Brightness Sensor :Off
Size :Auto Wide
TV
Auto Wide
Wide
Panorama
Zoom1
Zoom2
4:3
BN68-00746A(GAIA2_Euro_ENG) 2004/08/23 03:55 PM Page 36