


English - 55
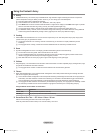
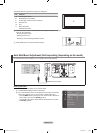
Using the Anti-Theft Kensington Lock (depending on the model)
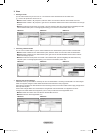
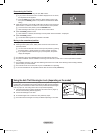
The Kensington Lock is a device used to physically x the system when using it in
a public place. The appearance and locking method may differ from the illustration
depending on the manufacturer. Refer to the manual provided with the Kensington
Lock for proper use. The locking device has to be purchased separately.
1.
Insert the locking device into the Kensington slot on the LCD TV (Figure 1)
and turn it in the locking direction (Figure 2).
2. Connect the Kensington Lock cable.
3. Fix the Kensington Lock to a desk or a heavy stationary object.
The location of the Kensington Lock may be different depending on its model.
N
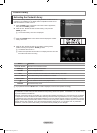
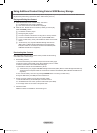
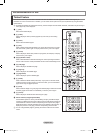
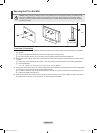
Remembering the Position
2. Adjust to the desired position using the ▲,▼,◄,► buttons.
If you press an arrow button when no OSD is displayed on the TV screen,
the Adjustment screen appears.
Press the INFO button to reset. Press the ◄ or ► button to select “Yes”,
then press the ENTER
E
button. The position is initialized to the default
setting.
3. Press the blue button. Press the ▲ and ▼ buttons to select a save mode from
either Position 1, Position 2 or Position 3 in order to save the current position.
To not save the current position, press the RETURN button.
When selecting a save mode, you cannot use the Colour buttons.
4. Press the ENTER
E
button to save.
When Position1 is selected, the message “Current position saved as Position1” is displayed.
5. Press the ENTER
E
button.
The saved Position appears on the left side of the OSD.
Moving to the remembered position
1. Complete Step 1 of “Entering the menu”.
2. Pressing a Colour (Red, Green, Yellow) button moves the auto wall mount to
the saved position.
You can move the wall mount to one of the 3 pre-set positions by pressing
the Red (Position 1), Green (Position 2) or Yellow (Position 3) buttons.
If you adjust the Position after moving to a pre-set position, the position
display will disappear.
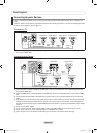
For installation, refer to the Installation Manual provided with the wall mount.
For product installation and the installation and moving of the wall mount, make sure to consult a specialized installation
company.
This installation manual is to be used when attaching the wall mount to a wall. When attaching to other building materials,
please contact your nearest dealer.
The auto wall mount will not work when Anynet
+
or WISELINK Pro is operating.
37, 40 and 46 models are not compatible with the older wall mount model (WMN5090A).
N
N
N
O
N
N
N
N
N
N
N
N
N
Wall-Mount Adjustment
Position 1 2 3
Adjust Save Centre
Save
Select a mode to save.
Move Enter Return
Position1
Position2
Position3
<Optional>
Figure 2
Figure 1
Cable
BN68-01700C-Eng.indb 55 2008-08-06 �� 4:24:50