


64 Editing
Audio dubbing
(SLV-EZ77AS/
EZ77NZ only)
This feature lets you record over the
normal audio track. The monaural
sound previously recorded is replaced
while the original hi-fi sound remains
unchanged. Use this feature to add
commentary to a tape that you have
recorded with a camcorder.
Before you start editing
• Turn on your TV and set it to the
video channel.
• Press INPUT SELECT or PROG +/– to
display “L1”, “L2” or “L3” in the
display window.
1 Insert a source tape into the stereo system (or the playback VCR).
Search for the point to start playback and set it to playback pause.
2 Insert a prerecorded tape into this (recording) VCR. Search for the end
of the section to be replaced and press X PAUSE.
Make sure that the tape has its safety tab in place.
3 Press CLEAR to reset the counter to “0:00:00.”
4 Rewind the prerecorded tape to the beginning of the section to be
replaced.
The VCR pauses.
5 Press AUDIO DUB.
The
indicator appears in the display window.
6 To start editing, press the X PAUSE buttons on this VCR and the stereo
system (or other VCR) at the same time.
When the counter reaches “0:00:00”, audio dubbing stops automatically.
To stop while editing
Press the x STOP buttons on this VCR and the stereo system (or other VCR).
To listen to both the hi-fi and normal audio
Set AUDIO MIX to ON in the SET UP MENU (page 61). Use this feature to
listen to dubbed audio over the original hi-fi audio. When AUDIO MIX is set
to ON, the AUDIO MONITOR button does not function. Remember to reset
AUDIO MIX to OFF after playing the tape.
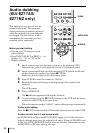
0
CLEAR
AUDIO DUB
X PAUSE
123