


29
GB
Continued on next page
Installing
Follow the procedure below to install the software.
Notes
• Log on to the computer using an account with administrator privileges before installing
the software.
• In order to use Click to DVD software, you must first install Drag’n Drop CD+DVD
software.
• The SonicStage Ver.1.x DVD±RW Drive Support Update Program can only be
installed if Drag’n Drop CD+DVD software and the SonicStage CD-R Writing Module
are already installed. The SonicStage CD-R Writing Module can be found on the Sony
applications CD-ROM supplied with your computer.
• Shut down all other Windows applications before installing the software. Otherwise
installation may not complete normally.
• During installation, the computer may seem to have stopped, but if the access indicator
on the drive or the hard disk indicator of the computer is lit or flashing, the installation
is still in progress. Do not attempt to stop the installation or shut down the computer.
Otherwise it may become impossible to install the software the next time and a
reinstallation of the operating system may become necessary.
• Befor installing Drag'n Drop CD+DVD software on a computer where Drag'n Drop CD
or Drag'n Drop CD+DVD software is already installed, you must uninstall Drag'n Drop
CD or Drag'n Drop CD+DVD software first. To do this, proceed as follows. On the
“Start” menu, click “Control Panel” and click “Add or Remove Programs”. Select
“Drag'n Drop CD” or “Drag'n Drop CD+DVD” from the list and click “Remove”.
• Before installing Click to DVD software on a computer where Click to DVD software
is already installed, you must uninstall Click to DVD software first. To do this, proceed
as follows. On the “Start” menu, click “Control Panel”, and click “Add or Remove
Programs”. Select “Click to DVD” from the list, and click “Remove”.
• The SonicStage Ver.1.x DVD±RW Drive Support Update Program will not be installed
if the existing SonicStage software on the computer is a newer version.
• To use Click to DVD software, Windows Media Format 9 SDK Runtime and DirectX
9.0b need to be installed. Follow the installation procedure below.
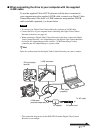
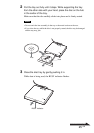
1 Turn on the computer, and prepare the drive for installation
as necessary.
To install the drive, see “Connecting the Drive” (page 12), and connect
the drive to your computer.
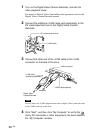
2 Insert the supplied software CD-ROM into the drive.
3 On the “Start” menu, click “My Computer”, double-click
“Drive E*”, open “Click to DVD”, and then double-click
“Setup.exe”.
*Drive E may have a different name depending on the computer you are using.
Follow the on-screen instructions.