


11
EN
EN
Disc
Management
Recording Playback
Introduction
Connections Basic Setup Editing Function Setup VCR Function Others
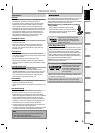
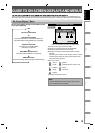
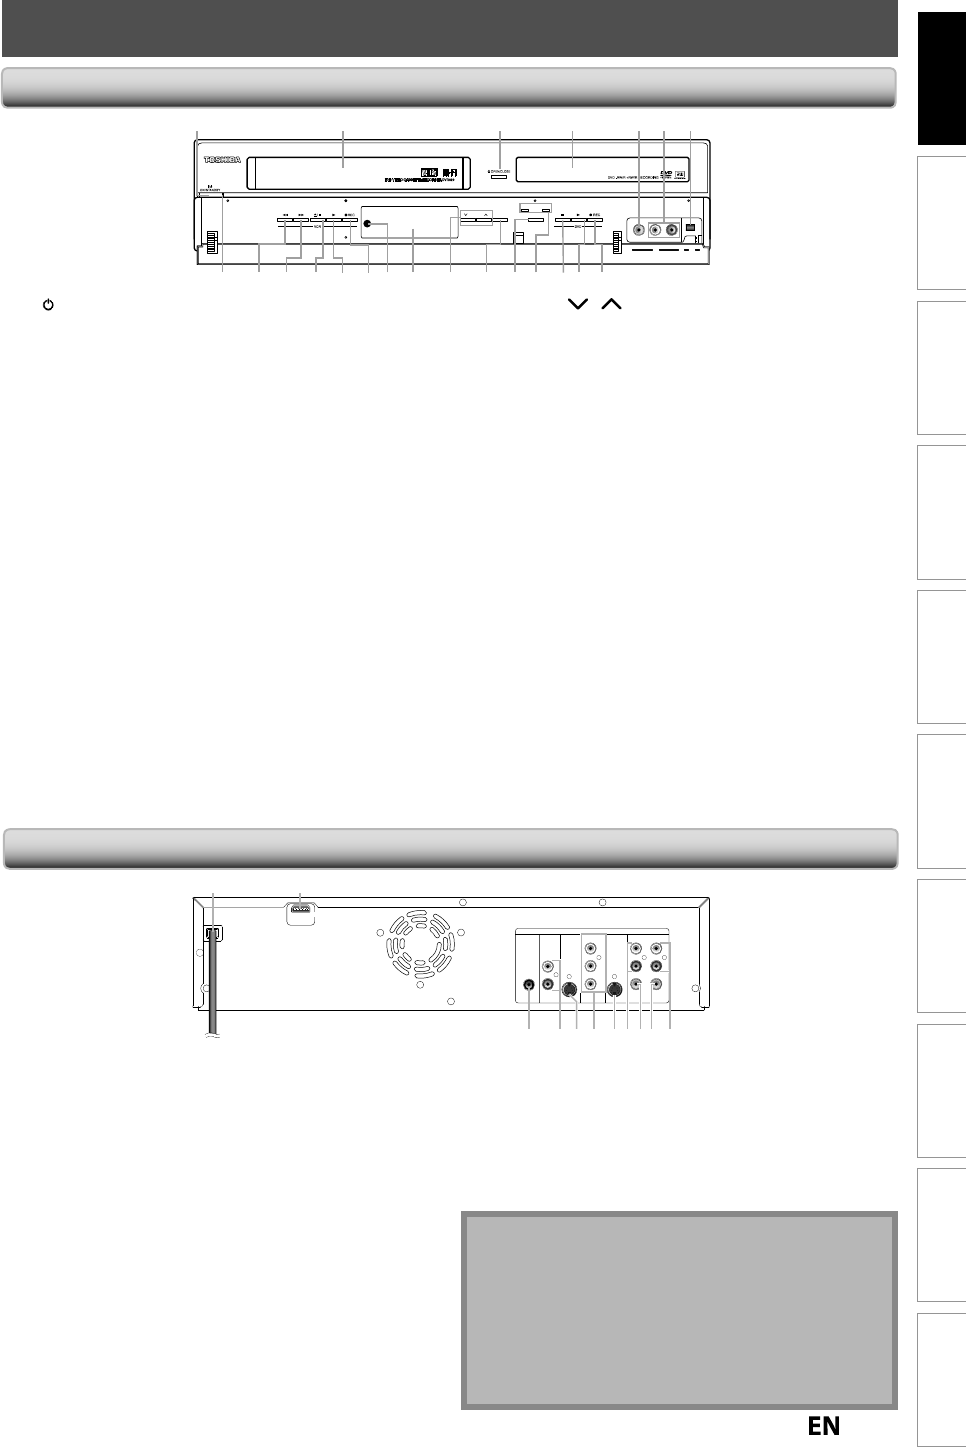
FUNCTIONAL OVERVIEW
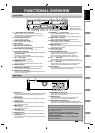
TRACKING
DUBBING SELECT
VCR DVD
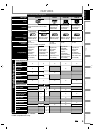
VIDEO L R DV IN
L2 L3
19 16 15 142021 1718 13 12 9*10 8
1 2 43* 5 7
11
6
22
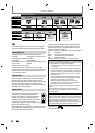
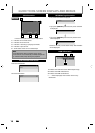
DIGITAL
AUDIO OUT
AUDI O
OUT
S-VIDEO
OUT IN
COAXIAL
L
R
L
Y
P
B
/CB
PR
/CR
R
L
R
S-VIDEO IN --- AU DI O --- OUT
IN --- VI DE O --- OUT
COMPONENT
VIDEO OUT
DVD/VCR
HDMI OUT
(L1)
1 2
37910 8 6 453
(
*
)
The unit can also be
turned on b
y
pressing
these buttons or b
y
insertin
g
a cassette tape
.
1. I
/
yy
ON/STANDBY button
(
DVD/VCR
)
•
Press to turn on the unit
,
or to turn the unit into the
standb
y
mode. (To completel
y
shut down the unit,
y
ou
must unplug the AC power cord.
)
2. Cassette com
p
artment
(
VCR
)
•
Insert a cassette ta
p
e here
.
3.
A
OPEN/CLOSE button
(
DVD
)*
•
Press to open or c
l
ose t
h
e
d
isc tra
y.
4. Disc tray (DVD)
•
P
l
ace a
d
isc w
h
en it is o
p
en
.
5. VIDEO input
j
ac
k
(L2) (DVD/VCR
)
•
Use
to
co
nn
ect
e
x
te
rn
al
de
vi
ce
wi
th
a
n R
C
A vi
deo
cable.
6. AUDIO input
j
ac
k
s (L2) (DVD/VCR
)
•
Use
to
co
nn
ect
e
x
te
rn
a
l
de
vi
ce
wi
t
h
a
n R
C
A
aud
i
o
cab
l
e.
7
.
DV
IN
j
ack (L3) (DVD/VCR
)
•
U
se to connect the DV out
p
ut of external device with a DV cable
.
8.
I
REC button
(
DVD
)
•
Press once to start a recording
.
•
Press repeatedl
y
to start the one-touch timer recording
.
9
.
P
LAY
B
button
(
DVD
)*
•
Press to start or resume p
l
a
yb
ac
k.
1
0.
S
T
O
P
C
b
utton (DVD
)
•
Press to stop p
l
a
yb
ac
k
or recor
d
ing
.
•
Press to stop t
h
e procee
d
in
g
timer recor
d
in
g
in DVD
.
11. VCR
/
DVD in
d
icator
•
Li
g
hts up when the VCR/DVD output mode is selected
.
12. VCR/DVD
b
utton
(
DVD/VCR
)
•
Press to select the component
y
ou wish to operate
.
13. DUBBING button
(
DVD/VCR
)
•
Press to start VCR to DVD (DVD to VCR) du
p
lication which
y
ou set in the main menu
.
14. TRA
C
KING
/
b
uttons (VCR)
•
Press to a
d
just t
h
e trac
k
ing
d
uring p
l
ay
b
ac
k
or in s
l
ow
motion o
f
the cassette tape.
•
W
h
i
l
e p
l
ay
b
ac
k
is in sti
ll
mo
d
e, you can sta
b
i
l
ize t
h
e picture
.
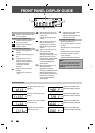
15. Display (“O
ff
” in standby
)
•
Re
f
er to “FRONT PANEL DISPLAY GUIDE” on page 18
.
16. In
f
rared sensor window (DVD/VCR)
•
Receive signals
f
rom your remote control so that you can
control the unit
f
rom a distance
.
17
.
I
REC
b
utton (VCR)
•
Press once to start a recor
d
ing. Press repeate
dl
y to start t
h
e
one-touc
h
timer recor
d
ing.
18.
P
LAY
B
b
utton (VCR
)
•
Press to start p
l
ay
b
ac
k.
19. EJE
C
T
/S
T
O
P
A
/
C
b
utton (VCR
)
•
W
h
en t
h
e unit is in stop mo
d
e, press to remove t
h
e
cassette tape
f
rom the cassette compartment.
•
Press to stop cassette tape p
l
ay
b
ac
k
or recor
d
ing
.
•
Press to stop t
h
e procee
d
ing timer recor
d
ing in VCR
.
20. FW
D
D
b
utton (VCR
)
•
Press to rapi
dl
y a
d
vance t
h
e cassette tape, or view t
h
e
picture rapidly in
f
orward during playback (
f
orward search).
21.
R
EV
E
b
utton (VCR
)
•
Press to rewin
d
t
h
e cassette tape, or to view t
h
e picture
rapi
dl
y in reverse
d
uring p
l
ay
b
ac
k
(rewin
d
searc
h
)
.
22. Power in
d
icator
•
T
h
is in
d
icator
l
ig
h
ts up in green w
h
en t
h
e unit is active an
d
turns o
ff
when the unit is in standby mode
.
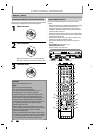
1. AC Power Cor
d
•
Connect to a stan
d
ar
d
AC out
l
et to supp
l
y power to t
h
is unit.
•
U
nplug this cord
f
rom the AC outlet to completely shut
d
own t
h
e unit.
2. HDMI OUT jac
k
•
U
se an HDMI ca
bl
e to connect to a
d
isp
l
ay wit
h
an HDMI
compati
bl
e port
.
3. AUDIO OUT jac
k
s
•
U
se to connect a TV monitor, AV receiver or ot
h
er
d
evice
wi
th
a
n R
C
A
aud
i
o
cable.
4. VIDEO OUT jac
k
•
U
se to connect a TV monitor, AV receiver or ot
h
er
d
evice
wi
th
a
n R
C
A vi
deo
cable.
5. VIDEO IN jac
k
(L1
)
•
U
se to connect externa
l
d
evice wit
h
an RCA vi
d
eo ca
bl
e
.
6. AUDIO IN jac
k
s (L1)
•
U
se to connect externa
l
d
evice wit
h
an RCA au
d
io ca
bl
e.
7. S-VIDEO IN jac
k
(L1
)
•
U
se to connect the S-video output o
f
external device with
an S-vi
d
eo ca
bl
e
.
8. COMPONENT VIDEO OUT jac
ks
•
Use to connect a TV monitor wit
h
component vi
d
eo inputs
wit
h
a component vi
d
eo ca
bl
e
.
9. S-VIDEO OUT jac
k
•
Use to connect the S-video input o
f
a TV monitor, A
V
receiver or ot
h
er
d
evice wit
h
an S-vi
d
eo ca
bl
e
.
10. COAXIAL DIGITAL AUDIO OUT jac
k
•
Use to connect an AV receiver, Do
lb
y Digita
l
d
eco
d
er or ot
h
er
d
evice wit
h
a coaxia
l
d
igita
l
input jac
k
wit
h
a
d
igita
l
coaxia
l
ca
bl
e
.
N
ote
• Do not touch the inner pins o
f
the
j
acks on the rear
panel. Electrostatic discharge ma
y
cause permanent
d
ama
g
e to t
h
e unit
.
•
Th
i
s
u
ni
t
does
n
ot
ha
v
e
the
RF m
odulato
r
.
Caution on usin
g
S-video, component, or HDMI
co
nn
ect
i
o
n f
o
r V
C
R
:
•
O
nl
y
the pla
y
back audio / video is available with
t
h
ese
co
nn
ect
i
o
n
s.
F
r
o
n
t
P
a
n
el
Rear Pane
l