


4
8
EN
EN
DV DUBBING
N
ote for DV dubbin
g
•
I
f
you press
[
PAUSE
F
]
at step 5 in “DVC to DVD Dubbing” on page 47, the tape will rewind to the point a
f
ew
secon
d
s prece
d
ing t
h
e pause
d
point. W
h
en you press
[
ENTER
]
at step 6 in “DVC to DVD Du
bb
ing” on page 47, t
h
en,
i
t wi
ll
start
d
u
bb
ing w
h
en it comes to t
h
e pause
d
point
.
•
Th
e unit
d
oes not sen
d
out t
h
e output signa
l
to DVC
.
• For the proper operation, connect DVC to the unit directl
y
. Do not connect this unit and DVC via an
y
other unit
.
•
D
o
n
ot
co
nn
ect
m
o
r
e
tha
n 1 DV
C.
•
Th
e unit can on
l
y accept DVC. Ot
h
er DV
d
evice suc
h
as ca
bl
e/sate
ll
ite
b
ox or D-VHS VCR cannot
b
e recognize
d.
• If no video si
g
nal is detected from the DVC durin
g
DVC to DVD dubbin
g
, the recordin
g
will be paused and
“
I
”
will
flash on the TV screen. The recordin
g
will resume when the unit detects the video si
g
nal a
g
ain
.
•
When the DVC is in camera mode, re
f
er to “Guide to DV and On-Screen Display” on page 46
.
•
You cannot dub
f
rom DVC during timer standby mode
.
• Y
ou
ca
nn
ot
dub
fr
o
m DV
C
to
t
h
e
bot
h DVD
a
n
d
V
C
R
at
t
h
e
sa
m
e
t
im
e.
•
You cannot change the output mode during DVC to VCR dubbing. I
f
y
ou want to switch to the DVD mode, stop
t
h
e
V
C
R fir
st.
•
During DVC to VCR
d
u
bb
ing, you cannot c
h
ange c
h
anne
l
s w
h
i
l
e pause
d.
• When output is in DVD mode while pla
y
ing back a DVD using L3(DV-IN),
y
ou cannot switch to the VCR mode.
•
If you are using anything other than L3(DV-IN) to playback DVD, you can switch to the VCR mode, but cannot
select L3(DV-IN) channel. (You can select L3(DV-IN)) a
f
ter switching to the DVD mode during VCR pla
y
back.
)
•
During timer standby o
f
either component, you cannot select L3(DV-IN) even on the component which is not in
timer stan
db
y
.
• Date / time and cassette memor
y
data will not be recorded
.
• Pictures wit
h
a cop
y
-guar
d
signa
l
cannot
b
e recor
d
e
d.
•
A DV terminal is a terminal that can use the transmission mode con
f
orming to the IEEE 1394 standards called “Fire
Wire”. It serves as the inter
f
ace that connects the PC and peripheral device such as “i.LINK” (registered trademar
k
o
f
SONY). It enables digital dubbing between DV devices with little degradation
.
DVC to VCR Du
bb
in
g
Be
f
ore recordin
g
f
rom DVC, re
f
er to pa
g
e 44
f
or connection
i
n
st
r
uctio
n
s.
This DVC to VCR dubbing is available onl
y
f
or audio
/
video out connection and not available for S-video
,
component or HDMI connection. (Re
f
er to
“Information on VCR Functions” on pa
g
e 93)
.
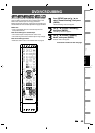
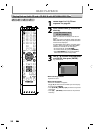
1
Repeat t
h
e steps 1 an
d
2 on pa
g
e 47
.
2
Press the PLAY button on
y
our DVC
to find where
y
ou wish to start
dubbin
g
. Then, press the PAUSE
butto
n
o
n
t
h
e
DV
ca
m
co
r
de
r wh
e
n
y
ou come to the desired start point
.
3
Press
[
REC
I
]
to start recordin
g
.
4
Pr
ess
the
PLAY
butto
n
o
r
the
PA
US
E
b
utton on your DVC to resume t
h
e
p
l
ay
b
ac
k.
The dubbin
g
will start
.
To pause the recordin
g:
P
ress
[
PAUSE
F
]
on
c
e.
“
I
” will
f
lash
.
To resume recordin
g:
P
r
ess
[
REC
I
]
or
press
[
PAUSE
F
]
aga
i
n
.
“
I
” wi
ll
reappear
.
5
To stop recor
d
ing, press [STOP
C
]
.
P
ress
[
VCR
]
first
.
Preparin
g
for DV to VCR dubbin
g:
• Insert a recordable cassette tape and make sure
y
our
DV
C
i
s
in vi
deo
m
ode.
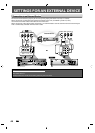
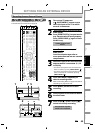
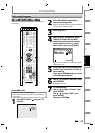
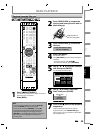
DISC MENU
CLEAR RETURN
TOP MENU
ENTER
INSTANT
SKIP
PLAY
DVDVCR
PAU S E
REV
SKIP
STOP
SKIP
FWD
1.3x/0.8x
PLAY
TIME SLIP
RECREC MODEDUBBING
PAU SE
REC
STOP
VCR