


76
PERFORMING A GENERAL BACKUP
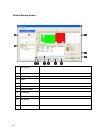
1. Click the Backup Button on the Main Display Screen.
2. Select the date or dates to back up video from using the calendar. Dates highlighted in blue contain recorded data.
3. Select the blocks of time to back up using the Hour/Minute Menu. Blocks of time with recorded video are highlighted in green.
Blocks of time selected for backup are highlighted in red.
4. Select the drive or drives to save the backup video to using the Select Backup Media Menu, Network Drive Button, or Browse
Button. When selecting the DVD-R Drive you must specify the number of DVDs to use for backup.
5. Set the backup order using the Backup Order Button.
6. Select the Include Viewer Checkbox to include the Backup Viewer Application.
7. Click the Start Backup Button to begin the backup process. A progress bar will be displayed in the lower right corner of the main
screen.
PERFORMING A CLIP BACKUP
1. Click the Backup Button on the Main Display Screen.
2. Click the Clip Backup Tab at the top of the Backup Center Screen.
3. Set the Backup Time and End Time of the video to backup in the Time Setup Box.
4. Select the Cameras to back up in the Channel Selection Box.
5. Select the Backup Drive to save the backup video to.
6. Check the Include Viewer Checkbox to include the Backup Viewer Application.
7. Enter pertinent clip information into the Clip Information section in the Description Box.
8. Click the Start Backup Button to begin the backup process. A progress bar will be displayed in the lower right corner of the main
screen.
PERFORMING A SCHEDULED BACKUP
1. Click the Backup Button on the Main Display Screen.
2. Click the Schedule Tab at the top of the Backup Center Screen.
3. Set the Backup Time to perform the backup.
4. Set the Repeat Backup Time to specify the number of hours between backup procedures (between 1 and 24 hours).
5. Select the Backup Drive to save the backup video to using the Select Backup Media Menu or the Network Drive Button. To save
to a local drive or partition you must first rename the location “Backup”
6. Check the Overwrite on Disk Full checkbox to overwrite previous scheduled backups when the disk becomes full.
7. Click the Save Backup Setting Button to save the current backup setting and return to the Main Display Screen.