Chapter 2: Installation
Power connection
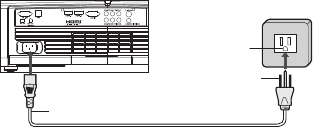
1. Remove the projector lens cap.
2. Plug the attached power cord into the AC power socket of this projector.
3. Plug the other end of the power cord into a power outlet.
1
2
Power cord (example)
Grounding
Power outlet
terminal
• The power cords for use in the U.S., UK and Europe are included with this projector. Use the
appropriate one for your country.
• This projector uses the power plug of three-pin grounding type. Do not remove the grounding
pin from the power plug. If the power plug doesn’t fit your wall outlet, ask an electrician to
change the wall outlet.
• The provided power cord for the U.S. is rated at 120 V. Never connect this cord to any outlet or
power supply using other voltages or frequencies than rated. If you use a power supply using
other voltage than rated, prepare an appropriate power cord separately.
• Use 100-240 V AC 50/60 Hz to prevent fire or electric shock.
• Do not place any objects on the power cord or do not place the projector near heat sources to
prevent damage to the power cord. If the power cord should be damaged, contact your dealer
for replacement because it may cause fire or electric shock.
• Do not modify or alter the power cord. If the power cord is modified or altered, it may cause fi
re or electric shock.
Caution:
• Plug in the power cord firmly. When unplugging, hold and pull the power plug, not the power cord.
• Do not plug in or out the power cord with your hand wet. It may cause electric shock.
Audio and Video Devices Connectivity Configuration
ViewSonic Pro8100 offers a full complementary video input connectivity - from the hi-tech HDMI
to the basic composite video.
There are vast possibilities of audio & video connectivity configurations user can choose from.
However the best setup combination relies on user’s equipments and using preferences.
Please seek professional advice for best matching setup. The video input type priority sequence is
listed below:
• HDMI
•Component Video • S-Video • Composite Video
The illustration below shows some recommended setup configuration possibilities.


