10
Your Link 20 comes with default
values chosen to work with most systems.
Normally the only values that need to be
changed are the battery capacity, battery
type (liquid or gelled), and high discharge
rate compensation (Peukert) exponent.
Please be sure you understand each
function before changing the factory
default values outlined below.
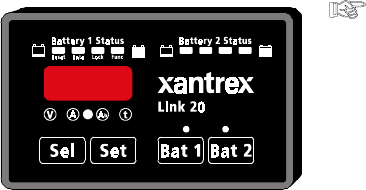
Holding the SET button for five seconds accesses the Set Up and Advanced
Functions. The display will read SEL. If you press SEL once, you will display the first
Setup variable: Charged Voltage. Pressing SEL repeatedly will step through more variables:
Charged Current, battery amp hour capacity, and averaging period for Time Remaining.
Corresponding status lights come on for each.
If you continue pressing SEL, you will step through functions named in small text
below each of the lights on the Battery 1 Light Bar. Some functions have multiple displays.
These are described in later pages devoted to RESET, DATA, and LOCKing of your
meter. The next (right) battery status light indicates you've entered the Advanced
FUNCtions area (see page 17).
When a desired variable or function is displayed, pressing the SET button will
display the present value of the function. Pressing SET again will display the next choice.
If you hold the SET button, the display begins scrolling. When the desired value appears,
release the button. If the button is held down longer, the display will increment to the end
of its range, then roll over to its minimum value and continue to scroll.
If this sounds complicated, relax! It's not. Once you go through it a few times, it will
become second nature. On the next page, we'll go through this again step-by-step.
FACTORY DEFAULT VALUES
Monitoring Functions:
Charged Voltage = 13.2 volts for 12-volt systems
= 26.4 volts for 24-volt systems
Charged Current = 2% (of battery capacity, 4 amps @ 200 Ah)
Battery Capacity = 200 Ah
CEF = 95% (Charge Efficiency Factor)
Ambient Temp. = 70
o
F
Battery Type = #1 (Liquid cells)
Peukert Exponent = 1.25
SETUP PROCEDURES
i4.25


