


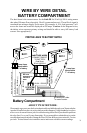


38
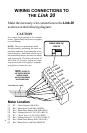
Once you have completed ALL instructions on page 35, insert the voltage sense
wire fuses (Blue Wire to fuse holder on battery #1, Violet Wire to fuse holder on battery
#2).
LAST, install the meter power fuse—Blue and Violet wire fuses first, RED wire
fuse LAST! The fuse should be in a fuse holder and should be connected in a smooth
motion. A "ragged" power up may cause a meter lock up. Both light bars and the digital
display should come on. The display will be flashing on initial power up.
Factory Default Settings
The LINK 20 comes on in the
(volts) mode with the display flashing to indicate that
it has been powered up from the de-powered state. Left untouched for 10 minutes, the
LINK 20 will go to "sleep", turning off the numeric display leaving only the two light bars
on. This is a power-saving feature. Touching either the SEL or SET buttons will return
the LINK 20 to the function it was in when it went to "sleep."
The LINK 20 is designed to work "out of the box." The factory default values are
appropriate for a moderate capacity 12 V liquid lead acid battery and a typical user
display and function setup.
Often, the only change that must be made is setting the
battery capacity. You may also have to set the battery type and an appropriate Peukert's
exponent.
LINK 20 factory default settings are:
1. Automatic Scanning of V, A, Ah, and time is OFF for both batteries.
2. Sleep Mode is ON. This turns the digital numeric display off after 10 min.
3. Charge Efficiency Factors (CEFs) equal 95% and learn CEF mode is on.
4. Charged Parameters: Voltage = 13.2, Charged Current = 2%. The battery
must exceed 13.2 V and the current must be less, in amps, than 2% of
declared capacity for five minutes to consider the battery full.
5. Battery capacities both set to 200 amp hours.
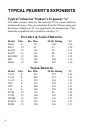
6. Peukert Exponents = 1.25.
START UP