16
1) Hold down the SET button until the numeric display says
SELSEL
SELSEL
SEL.
2) Now press the SEL button 11 times
F0i F0i
F0i F0i
F0i will appear in the display. You are now at
F01 in the FUNCtion mode.
3) Press SEL again until the function you wish to set up appears.
4) Press the SET button to show the current value of the function you have selected.
5) To change the function value, press SET. The display will scroll through the range
of available values. Stop scrolling when the value you wish appears in the display.
6) If you are only changing one function, simply leave the unit alone and in five seconds,
the display will return to normal and the choice you have made for the function
selected will be stored in memory.
7) If you wish to set up other functions, press the SEL button right away after making
your selection in Step 5. You'll now scroll on to the next function, which can be
changed the same way. When you have made all the changes desired, simply leave
the unit alone for five seconds and the values will be memorized and the display
returned to normal operation.
FUNCTIONS TABLE
The above section gave you the general approach to changing an Advanced Func-
tion setting. Now, we'll go through each of the Advanced Functions and explain
what each does and how you may wish to use it. If you ever get "lost" and want to
restore all factory default settings, simply follow the RESET procedure on page 25.
F01 - AUTO DISPLAY SCANNING
DEFAULT = OFF RANGE: OFF, ON
Automatically scans through the major displays, volts, amps, amp hours, and Time
of Operation remaining. Each value is displayed for four seconds.
Scanning applies only to the battery selected with the BAT button.
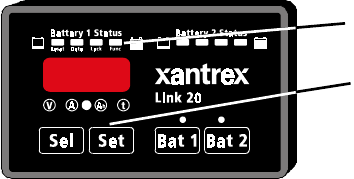
HOW TO SET UP FUNCTIONS
When the FUNC light is on,
you can access Advanced
Functions of the Link 20.
The values for each function
are changed using the SET
and SEL keys.
i4.25
