


5.0 System Overview
The vast amount of features in the XTune can seem overwhelming at first. As you will see it is pretty easy to catch on
once explained.
Using the 47 button full featured remote many of the functions can be accessed directly. When the menu button is
pressed, an On Screen Display (OSD) generated from the XTune will appear. As a protection against burning the screen
the XTune menu will close if not used for 20 seconds. The menu structure and features are described in the OSD section
of the manual. The menu is the key to all the features inside the XTune.
When the unit is first powered on the first item to take care of is matching the output resolution and output format to the
display device. The XTune can output Component (YPbPr) or RGB at many different resolutions. These can be changed
from the Menu under Display Setup. Once this is done the image will look its best. For example, if the LCD projector has
a native resolution of XGA (1024 x 768) then the XTune should be set to output XGA. If you do not then the projector will
have to scale as well making the image less than perfect. Aurora has put in most of the standard resolutions. Check in
the specification section to make certain we have a resolution to match. If not please contact Aurora technical support
as we might be able to add an additional resolution if it is within the units capability.
The XTune has a Main channel and a PiP channel. Any input on the unit can be sent to the Main as well as the PiP but
with limitations to the combinations. The XTune can only PiP the 15 pin RGBHV / YPbPr -vs- Video / S-Video / TV. It is
possible to watch PC and TV at the same time but video with TV will not work. Audio can follow the Main input or the PiP
input by using the F3 key on the remote.
Full control over the Main and PiP channel independently can make viewing more enjoyable. Controls for brightness,
contrast, saturation, sharpness, size, phase, position, blending, and much more are available via the menu. It is
beneficial to play with all the different features to see the effects for better or worse to find what works best for your
viewing. The XTune will automatically try to make the best image when first locked on to the source but this can be
overridden for additional sharpness, or maybe some noise reduction.
PiP modes vary based on output resolution. Some resolutions have a full set of PiP modes while others are limited do to
the aspect ratio (4:3 vs 16:9) and resolution. Check in the specifications section of the manual for the PiP mode vs
resolution that are currently available. Future firmware upgrades may add additional modes so keep an eye out for
updates.
Another great feature of the XTune is the ability to upgrade the firmware for additional features or fixes. Try to keep an
eye out for the latest releases on www.auroramultimedia.com to take advantage of the new version. The firmware is
easily upload to the XTune with the Flash123 utility that is free on our web site.
Remember, people see things differently. What looks good to one person may not to another. The power of the XTune
allows you to tailor the image to just about anyones liking. Most important... ENJOY!!!
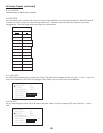
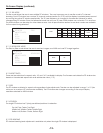
5.1 Understanding PiP modes
While the XTune is very powerful in the feature set, there are some hardware limitations based on output resolution and
source input resolution. The Main input can upscale and downscale any image. The PiP can only downscale or send
out equal resolution when outputting a progressive signal. That is why in some combinations the PiP window will not go as
large as other modes. For example, if the output is set to XGA and there is video in the PiP window, the window can only
go as high as 240p since the input resolution is a 480i and the output is a progressive signal. The resulting window will be
no larger than 1/3 the screen. The code protects a user from these limitations and will alert a user on screen when
certain configurations can not be done.
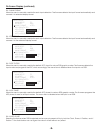
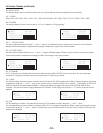
Side by Side mode has the toughest job since the PiP is forced to be at a specific size. PiP swap is not available in this
mode so it is easier to tell which side (Main or PiP) is better suited for the input vs the output. Example: XGA output will
only work if the RGB source is sent to the PiP side and the video is sent to the Main. However, in 1080i output it is best to
send RGB to the Main and Video to the PiP. If a combination does not work in side by side, try the opposite input (Main
vs PiP).
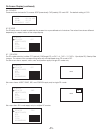
Overall, the PiP modes can be a very powerful tool if understood and implemented correctly. Presentations will benefit in
ways that could not be cost effectively done. Video Conferencing with the power of side by side and translucent PiP will
solve problems of years past trying to view hi-res computer with the far end. The best application for this unit is the one
you create!!!
-3-